Category: Game Optimization | Reading Time: 5 Mins
Hello friends! Welcome back to the blog.
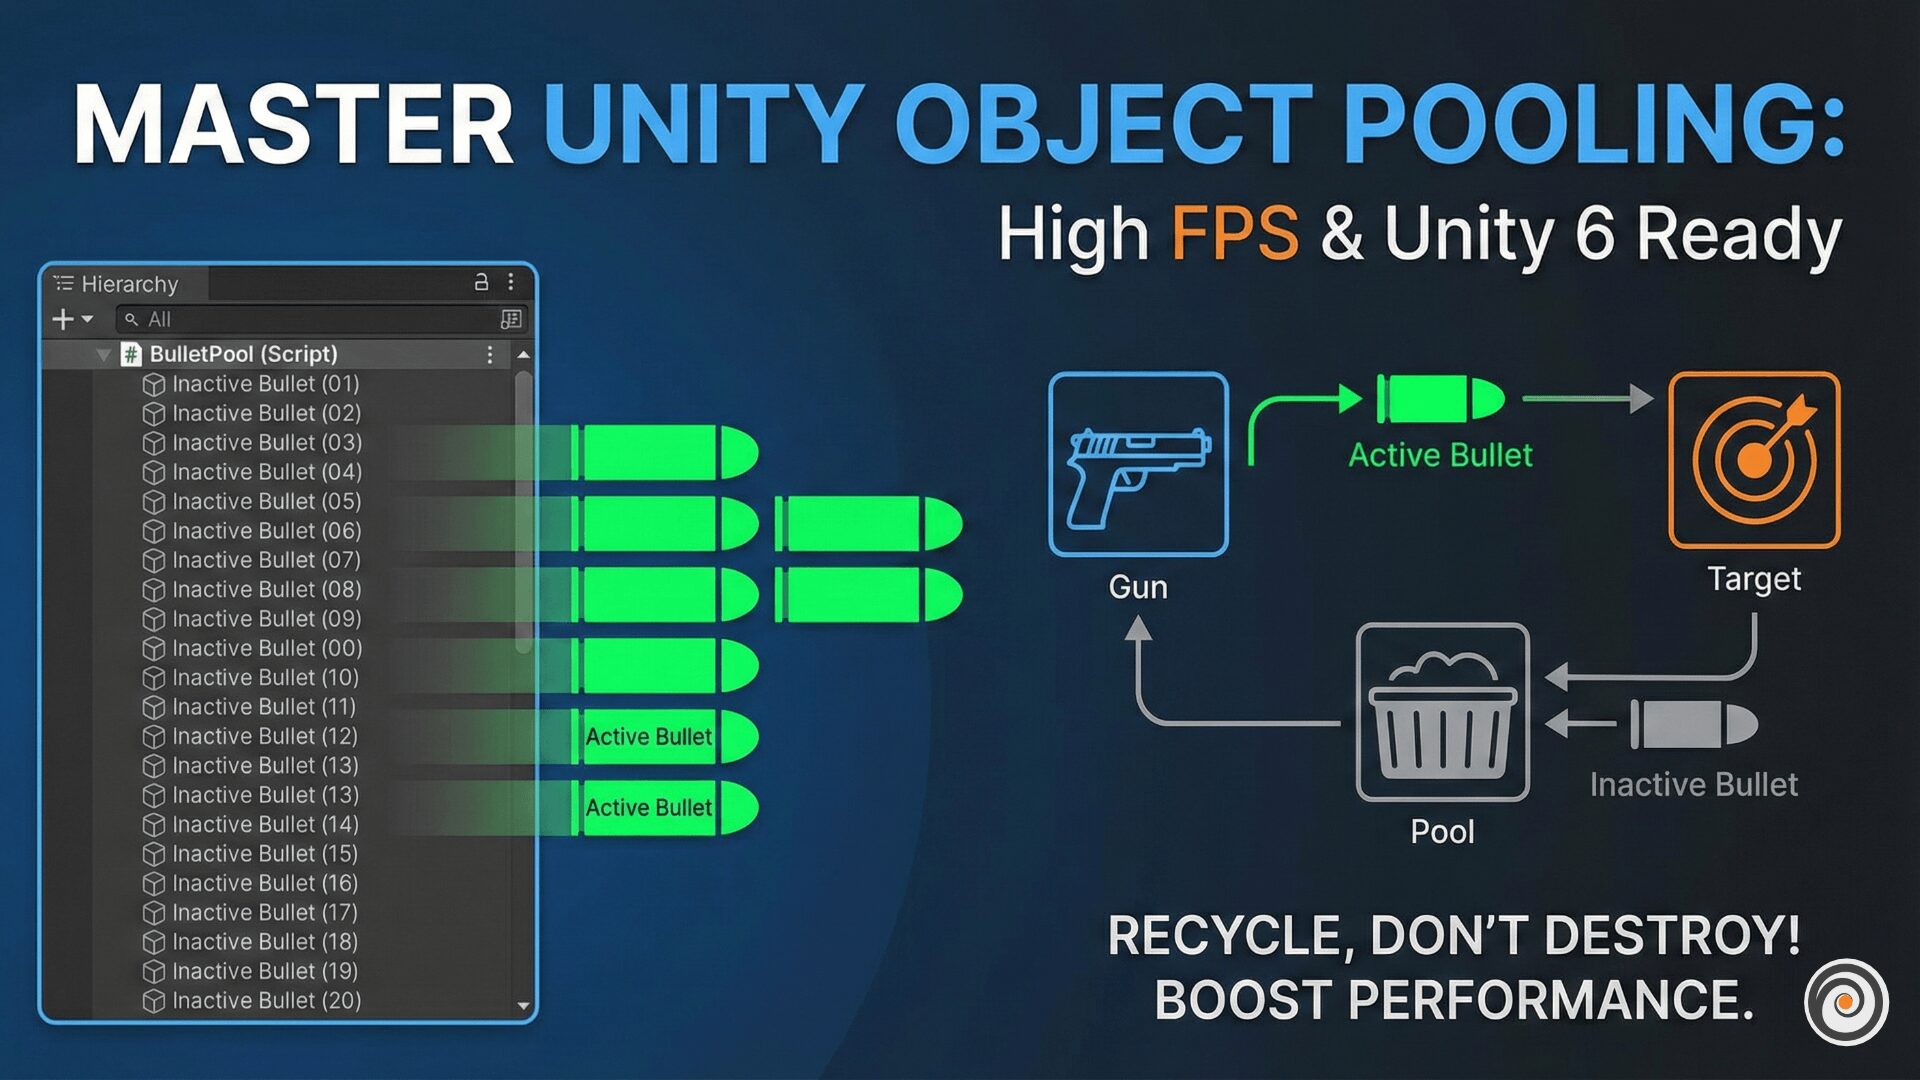
If you are a game developer, you know the biggest enemy of mobile games: LAG. You press the fire button, the game freezes for a millisecond, and the player gets angry. Why does this happen? Usually, it is because you are not using Unity Object Pooling.
In this tutorial, I will show you how to fix your frame rate drops using the official Unity 6 API. We will stop using Instantiate and Destroy and switch to a professional, high-performance system.
Why Do You Need Unity Object Pooling?
Before we look at the code, let’s understand the problem.
Every time you create a bullet using Instantiate() and delete it with Destroy(), you are giving heavy work to your CPU. We call this “Garbage Allocation.” If you do this 10 times a second, your mobile game will heat up and stutter.
Unity Object Pooling solves this by recycling objects. Instead of destroying a bullet, we simply disable it (SetActive(false)). When we need to shoot again, we enable it (SetActive(true)). It is simple, logical, and makes your gameplay smooth like butter.
Using the Official Unity 6 ObjectPool API
Many old tutorials teach you to write complex “Manager” scripts using Lists. But you don’t need to take that tension anymore!
According to the official Unity documentation, Unity now has a built-in class called UnityEngine.Pool. It handles memory management, error checking, and stack resizing automatically.
Below is a universal script that works on Unity 6, Unity 2022, and older versions. It also supports the New Input System automatically.
1. The Gun Controller Script (PhysicsGun.cs)
Copy this script to handle your shooting logic. It includes a special fix for the Unity 6 Physics API (where velocity was renamed to linearVelocity).
Script 1: The Gun Controller (PhysicsGun.cs)
using UnityEngine;
using UnityEngine.Pool; // 1. This is the Namespace we need

// Automatically detect if New Input System is installed
#if ENABLE_INPUT_SYSTEM
using UnityEngine.InputSystem;
#endif

public class PhysicsGun : MonoBehaviour
{
    [Header("Settings")]
    public GameObject bulletPrefab;
    public Transform firePoint; // Drag your Gun Barrel tip here
    public float bulletSpeed = 50f;

    // The Pool Variable - Defined in Unity Docs
    private IObjectPool<GameObject> bulletPool;

    void Awake()
    {
        // We initialize the pool here strictly following Unity Docs.
        // These 4 lines tell Unity exactly how to handle lifecycle.
        bulletPool = new ObjectPool<GameObject>(
            createFunc: CreateBullet,        // How to make a new one?
            actionOnGet: OnTakeFromPool,     // What to do when we use it?
            actionOnRelease: OnReturnToPool, // What to do when we finish?
            actionOnDestroy: OnDestroyBullet,// What to do if pool is full?
            collectionCheck: true,           // Important: Checks for errors!
            defaultCapacity: 20,             // Start with 20 bullets
            maxSize: 100                     // Don't keep more than 100
        );
    }

    void Update()
    {
        bool fired = false;

        // 1. Check Legacy Input (Old Way)
        #if ENABLE_LEGACY_INPUT_MANAGER
        if (Input.GetKeyDown(KeyCode.Space)) fired = true;
        #endif

        // 2. Check New Input System (Modern Way)
        #if ENABLE_INPUT_SYSTEM
        // Safety check: Ensure keyboard exists so VR doesn't crash
        if (Keyboard.current != null && Keyboard.current.spaceKey.wasPressedThisFrame) fired = true;
        #endif

        if (fired)
        {
            // Simple call to get bullet from pool
            bulletPool.Get();
        }
    }

    // --- THE MAGIC METHODS (Docs Requirement) ---

    // 1. CREATE
    private GameObject CreateBullet()
    {
        GameObject bullet = Instantiate(bulletPrefab);

        // Trick: Add the helper script automatically!
        // So you don't forget to add it in the Editor.
        var returnScript = bullet.AddComponent<ReturnToPool>();
        returnScript.pool = bulletPool;

        return bullet;
    }

    // 2. GET (Wake up)
    private void OnTakeFromPool(GameObject bullet)
    {
        bullet.transform.position = firePoint.position;
        bullet.transform.rotation = firePoint.rotation;
        bullet.SetActive(true);

        Rigidbody rb = bullet.GetComponent<Rigidbody>();
        if (rb != null)
        {
            // UNIVERSAL PHYSICS FIX for Unity 6
            // In Unity 6, 'velocity' is renamed to 'linearVelocity'.
            // This #if block makes sure your code works everywhere.

            #if UNITY_6000_0_OR_NEWER
            rb.linearVelocity = Vector3.zero;
            rb.angularVelocity = Vector3.zero;
            #else
            rb.velocity = Vector3.zero;
            rb.angularVelocity = Vector3.zero;
            #endif

            // Apply the instant kick force!
            rb.AddForce(firePoint.forward * bulletSpeed, ForceMode.Impulse);
        }

        // Bonus: Reset Trail Renderer if you have one
        TrailRenderer trail = bullet.GetComponent<TrailRenderer>();
        if (trail) trail.Clear();
    }

    // 3. RELEASE (Sleep)
    private void OnReturnToPool(GameObject bullet)
    {
        bullet.SetActive(false); // Just hide it, don't destroy it
    }

    // 4. DESTROY (Cleanup)
    private void OnDestroyBullet(GameObject bullet)
    {
        Destroy(bullet); // Only destroy if we cross 'maxSize' (100)
    }
}
2. The Helper Script (ReturnToPool.cs)
You also need this small script. It tells the bullet how to return itself to the pool when it hits a wall or if the player misses the shot.
using UnityEngine;using UnityEngine.Pool;
public class ReturnToPool : MonoBehaviour
{
// The Gun script will fill this variable for us automatically
public IObjectPool<GameObject> pool;
// 1. Return when hitting a wall/enemy
void OnCollisionEnter(Collision collision)
{
// ALWAYS check if active before releasing to avoid errors
if (gameObject.activeInHierarchy)
{
pool.Release(gameObject);
}
}
// 2. Auto-return after 3 seconds (if you miss the shot)
void OnEnable()
{
Invoke(nameof(ReleaseSelf), 3f);
}
void OnDisable()
{
CancelInvoke();
}
void ReleaseSelf()
{
if (gameObject.activeInHierarchy)
{
pool.Release(gameObject);
}
}
}Key Features of This Solution
Why is this code better than other tutorials on the internet?
Unity 6 Ready: I used a Preprocessor Directive (
#if UNITY_6000_0_OR_NEWER) to automatically switch betweenvelocityandlinearVelocity. This guarantees zero compiler errors.Safety First: The pool uses
collectionCheck: true. If you accidentally try to return the same bullet twice, Unity will warn you instead of crashing the game.Input System Support: Whether you use the old Input Manager or the package-based Input System, this script detects it automatically.
Conclusion
Implementing Unity Object Pooling is the single best thing you can do for your game’s performance. Your players will enjoy higher FPS, and your mobile battery life will last longer.
Try this code in your next project! If you found this tutorial helpful, please share it with your developer friends.
Happy Coding!