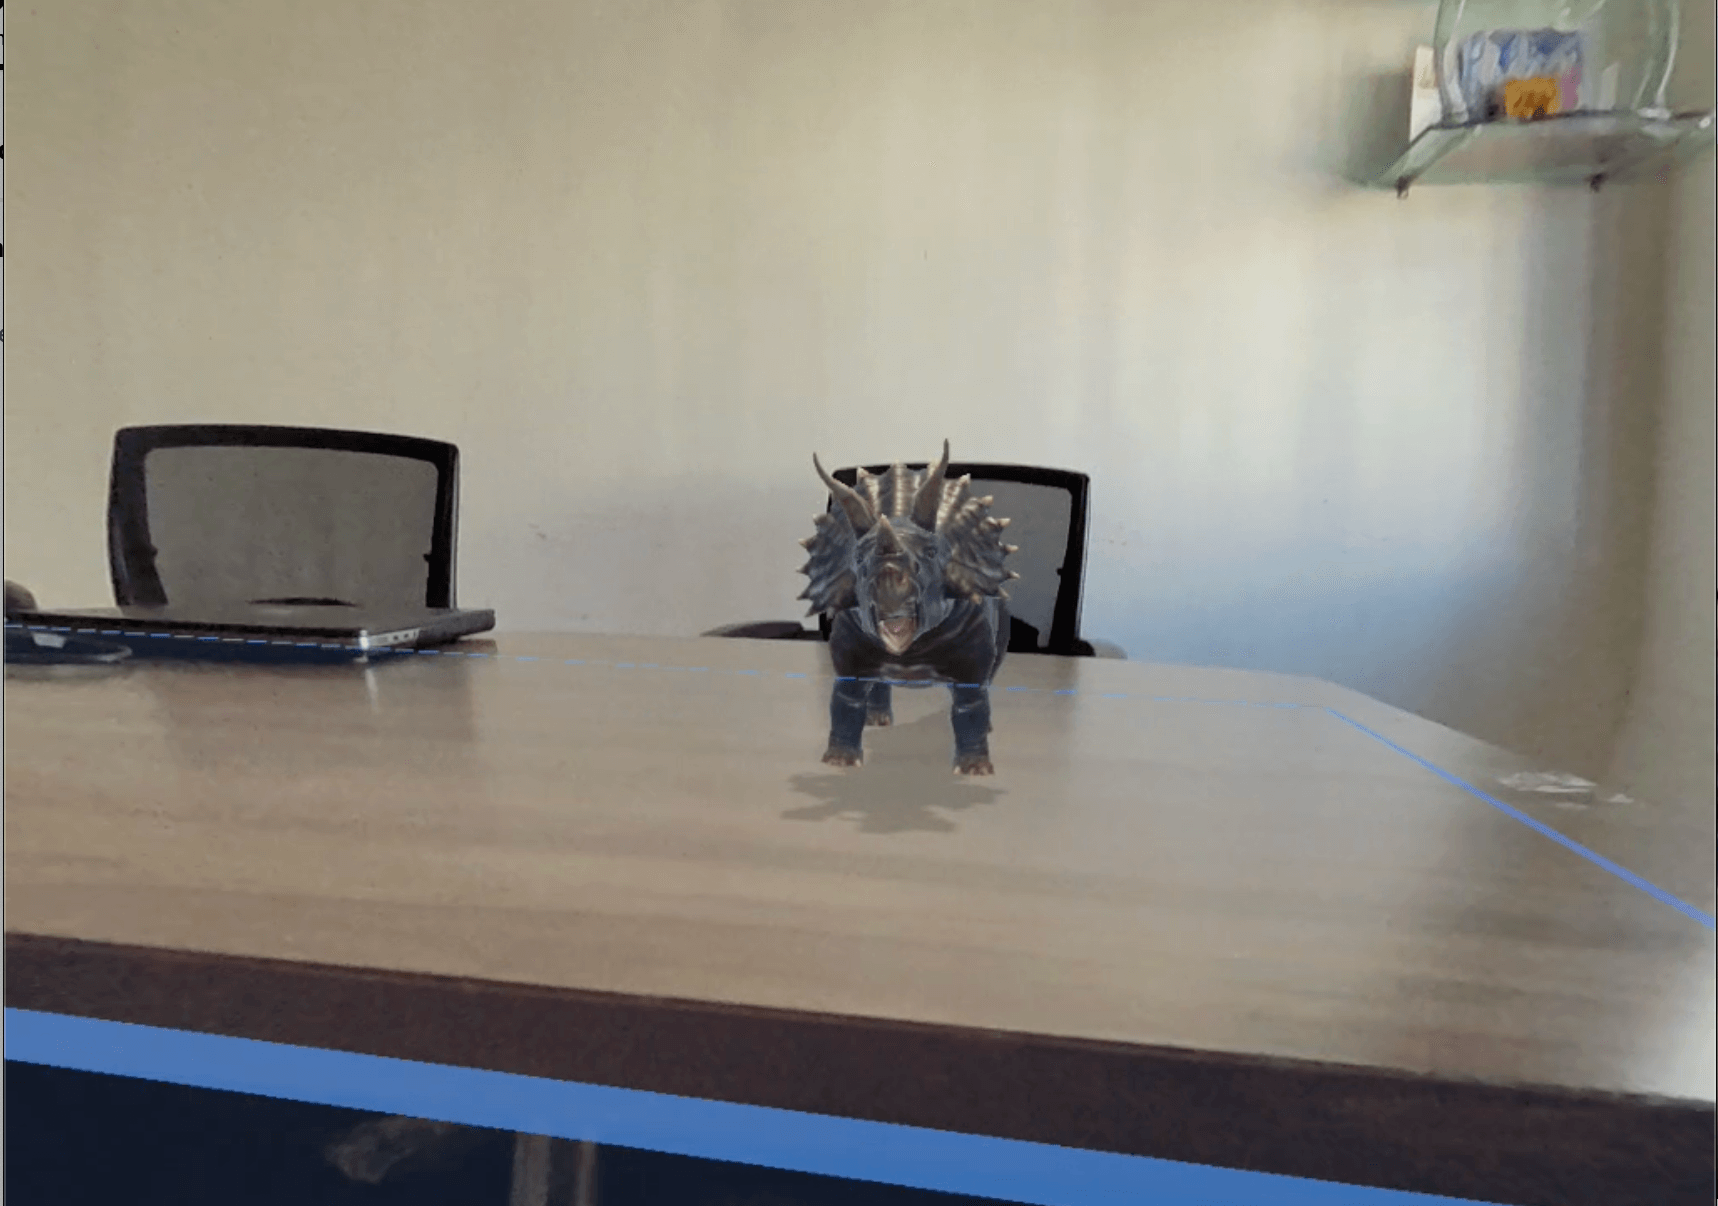
Immerse yourself in the future of Mixed Reality with Meta Quest 3! 🌐✨ Experience the magic of ‘Tap to Place’ object interaction, where the physical and virtual seamlessly merge. Dive into a new dimension of spatial computing, where your gestures bring digital content to life. Unleash your creativity and explore the possibilities of Mixed Reality with Meta Quest 3. The future is at your fingertips! 🚀🔮 #MixedReality #MetaQuest3 #TapToPlace
1 Unity Project Settings
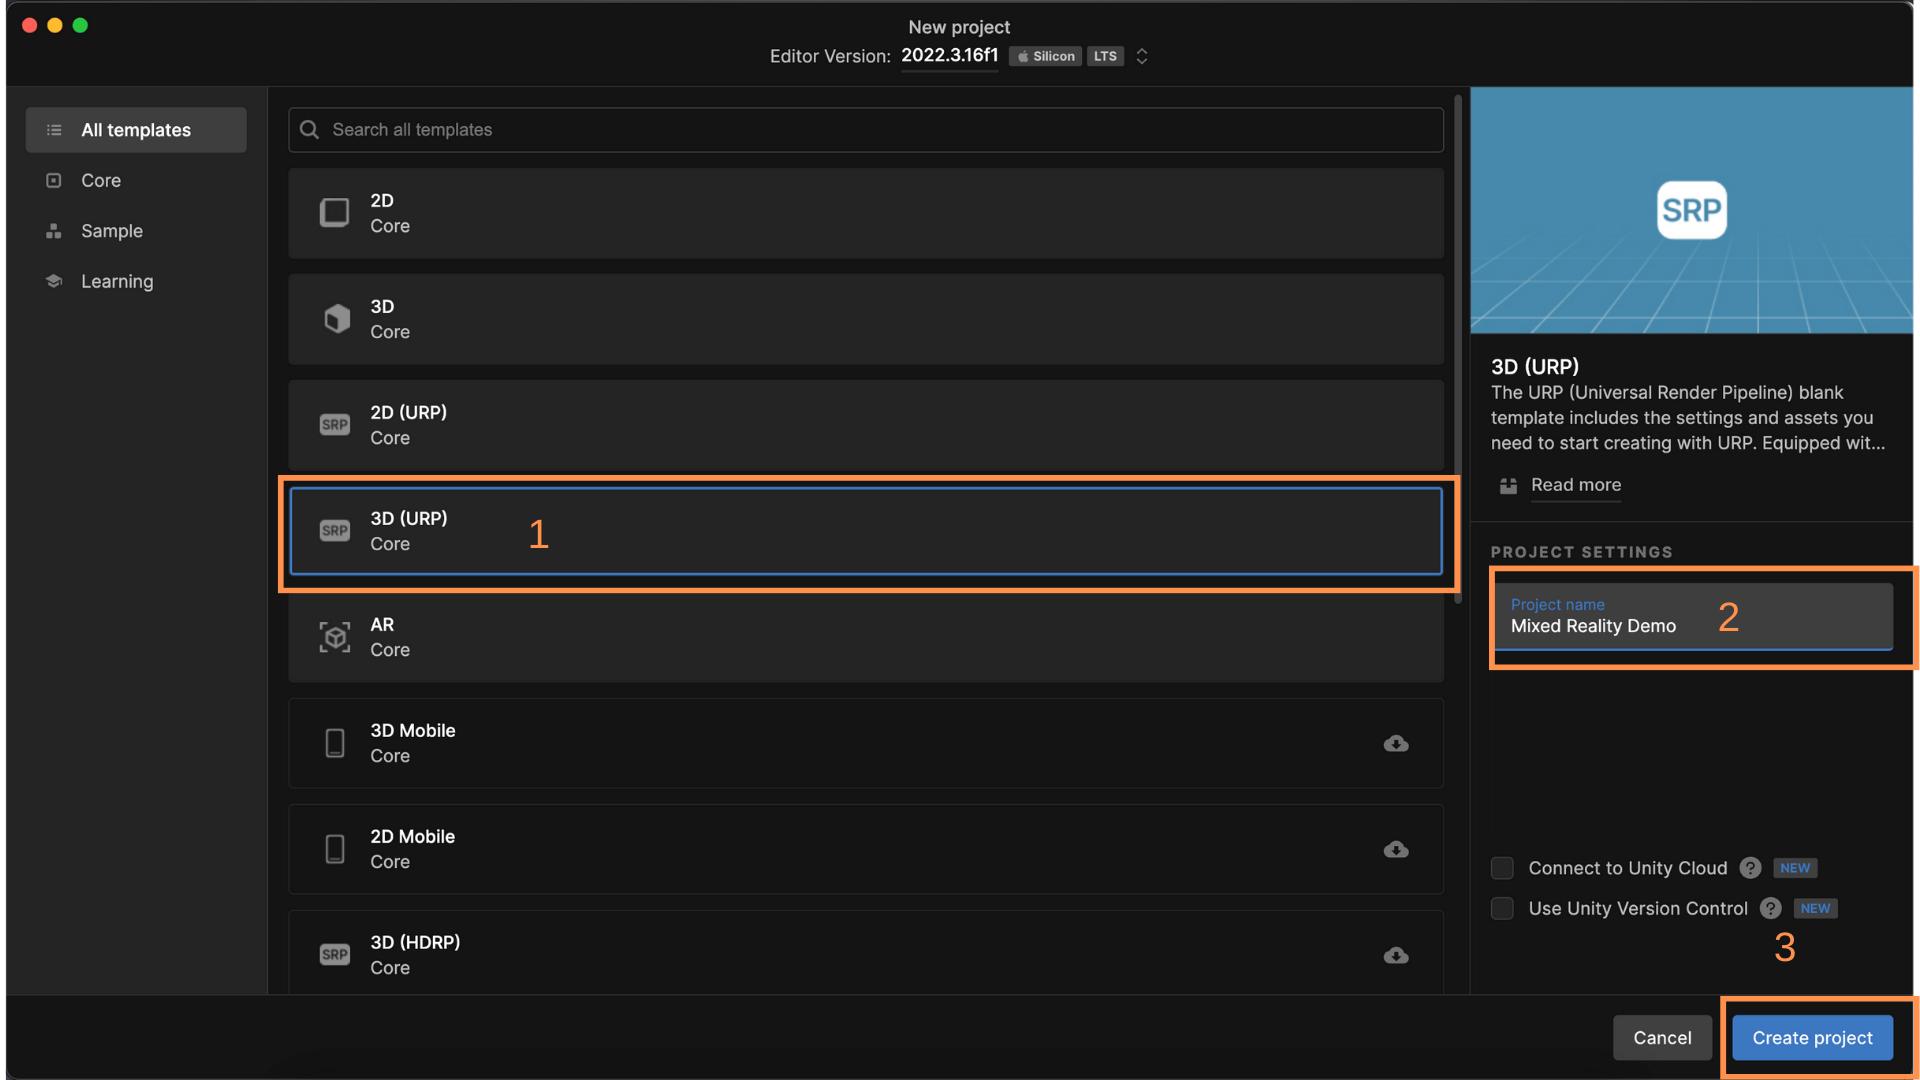
1 – Create New Unity Project :
- Launch the Unity Hub application.
- Click on the New button to create a new project.
- Choose a project name and location for your new Unity project.
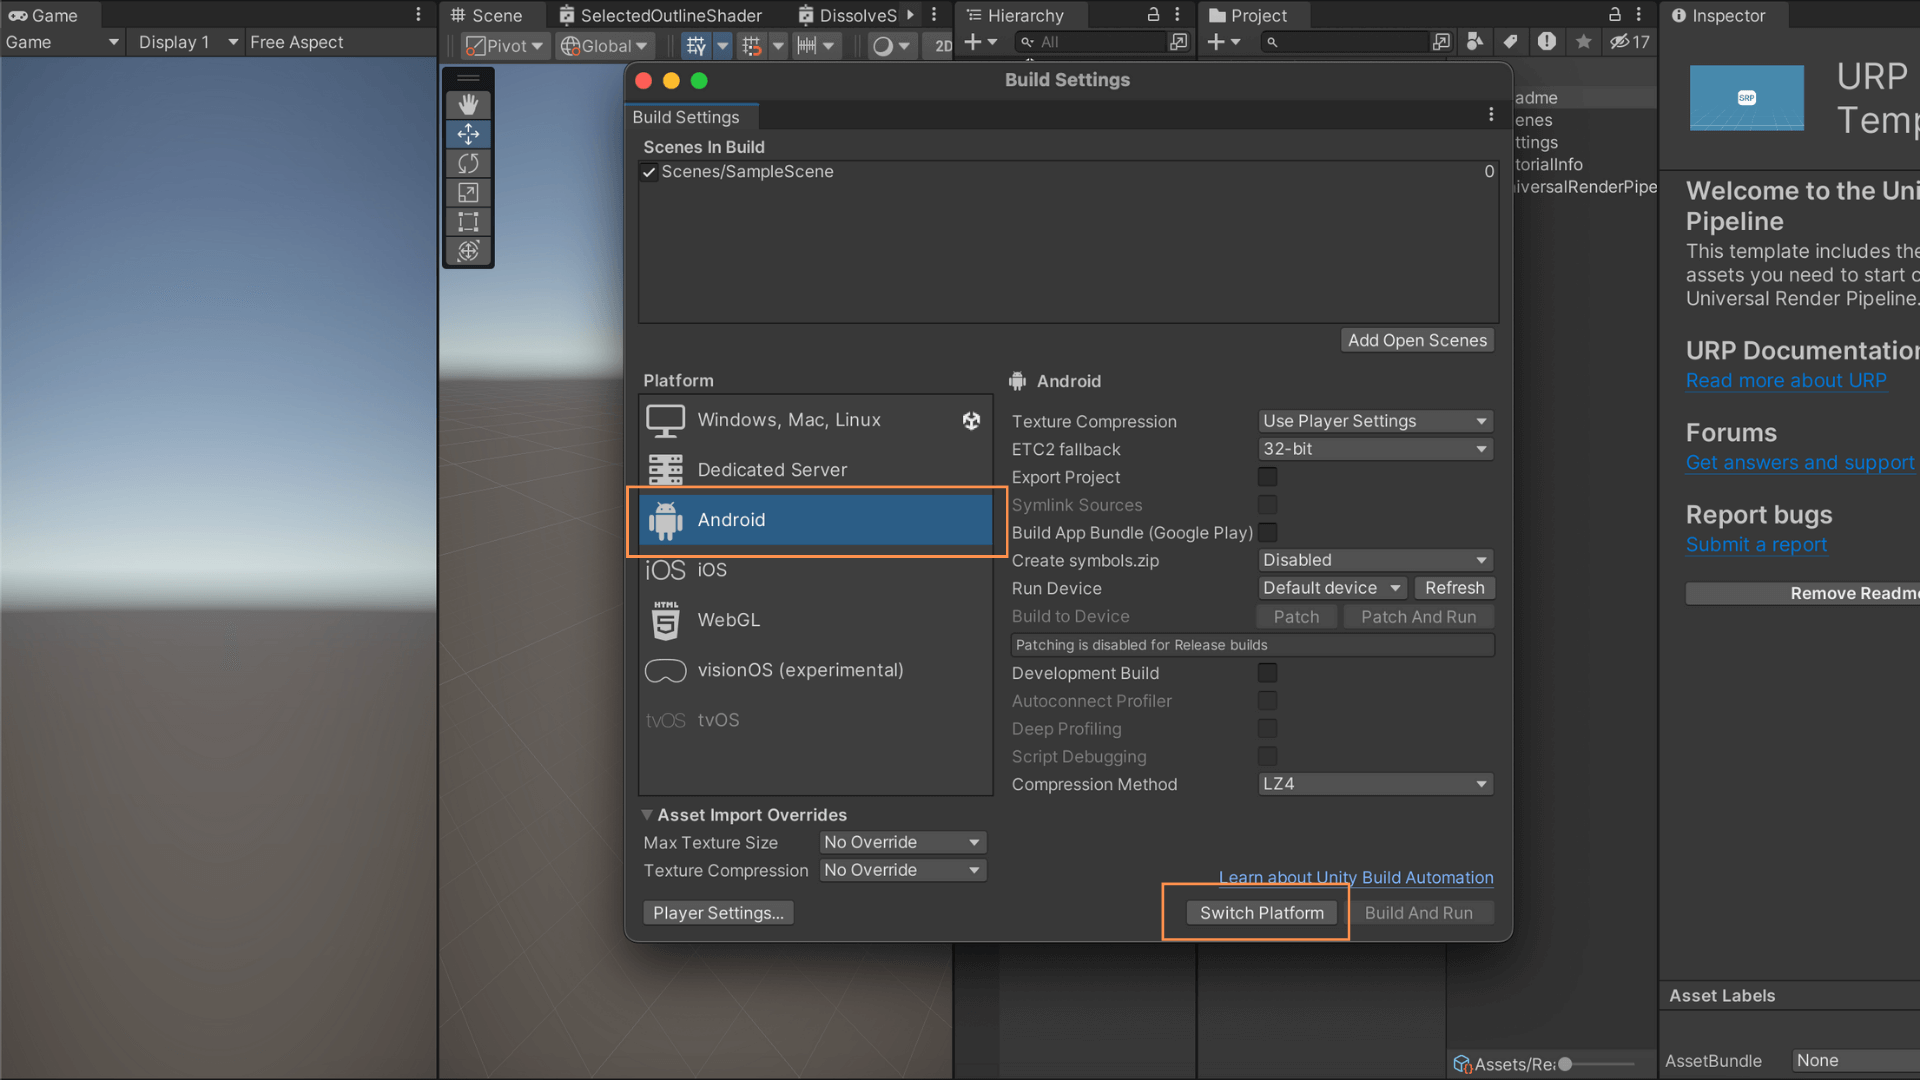
2 – Switch Platform to Android
- Open Build Settings:In the Unity Editor, go to File > Build Settings.
- Select Android Platform. After selecting the Android platform, click on the Switch Platform button.
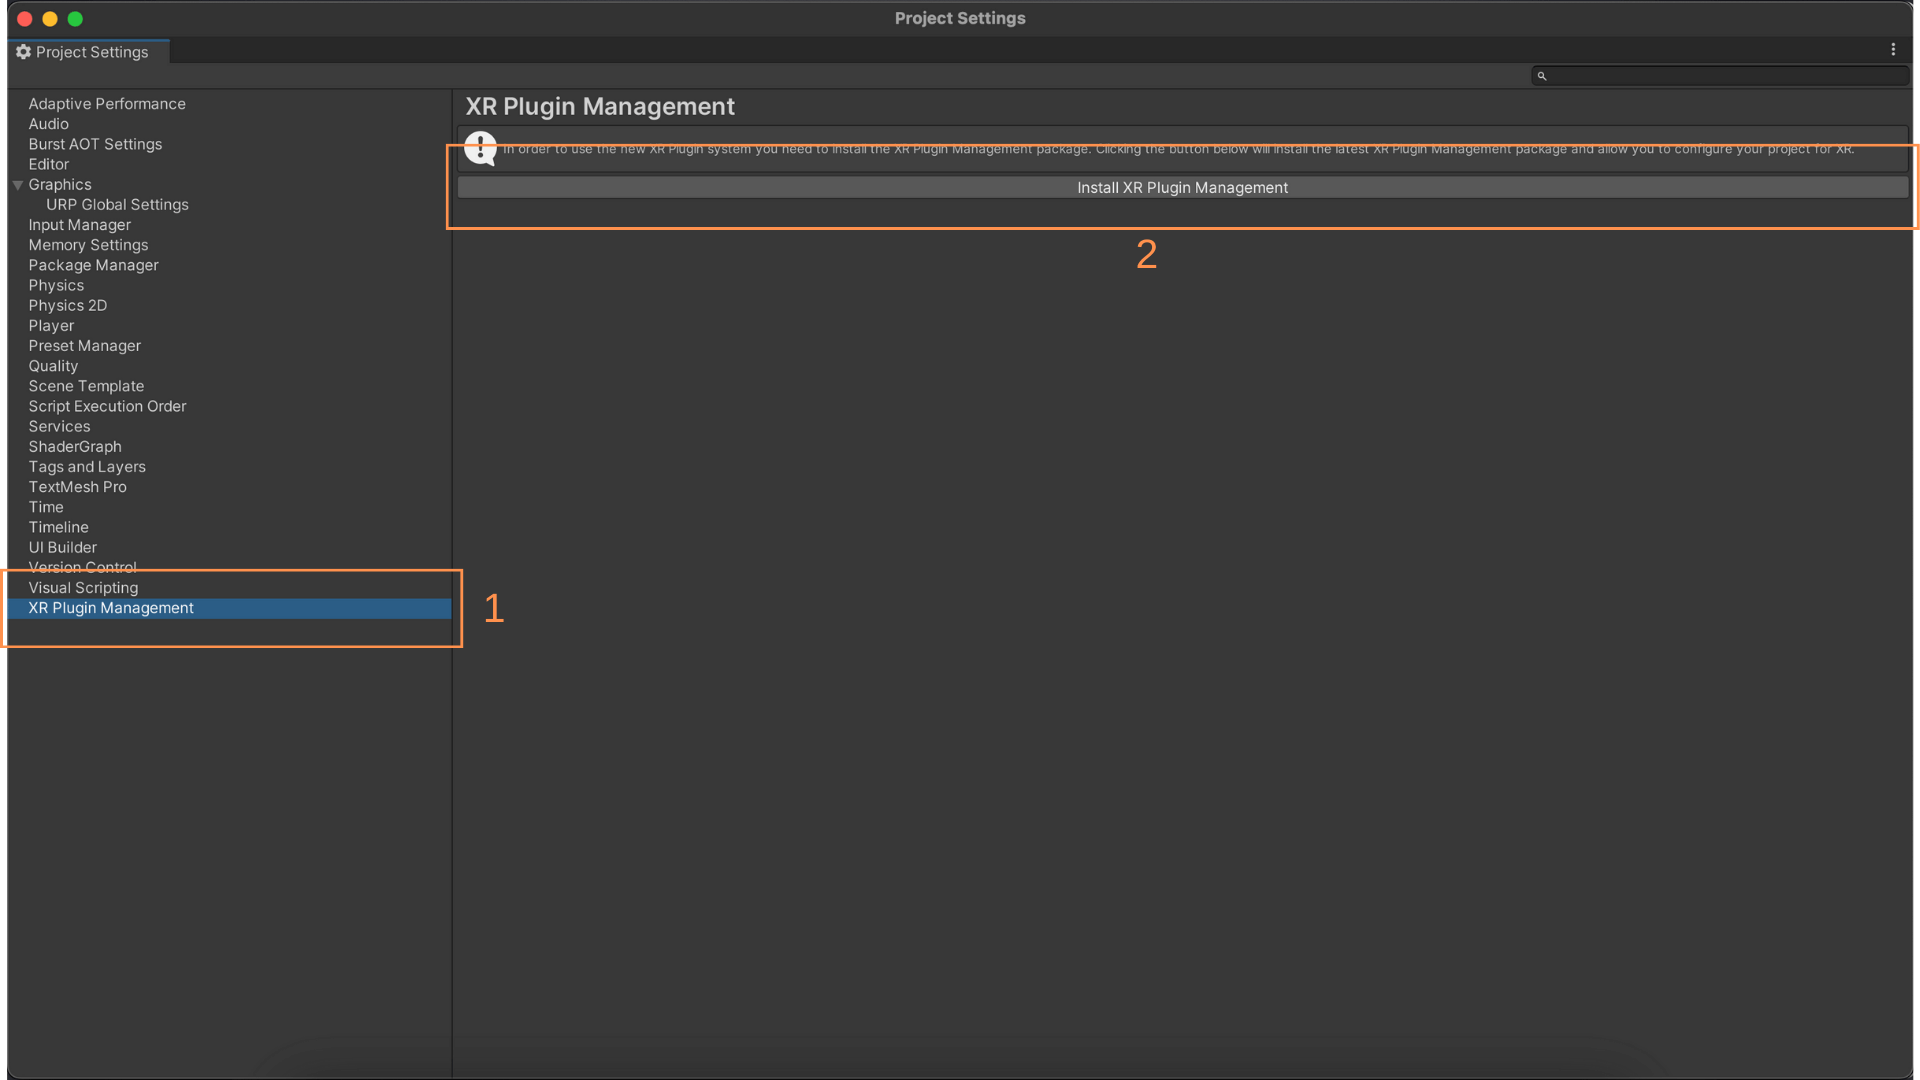
3 – Install XR Plugin Management:
- Go to Edit > Project Settings > XR Plug-in Management > Install XR Plugin Management
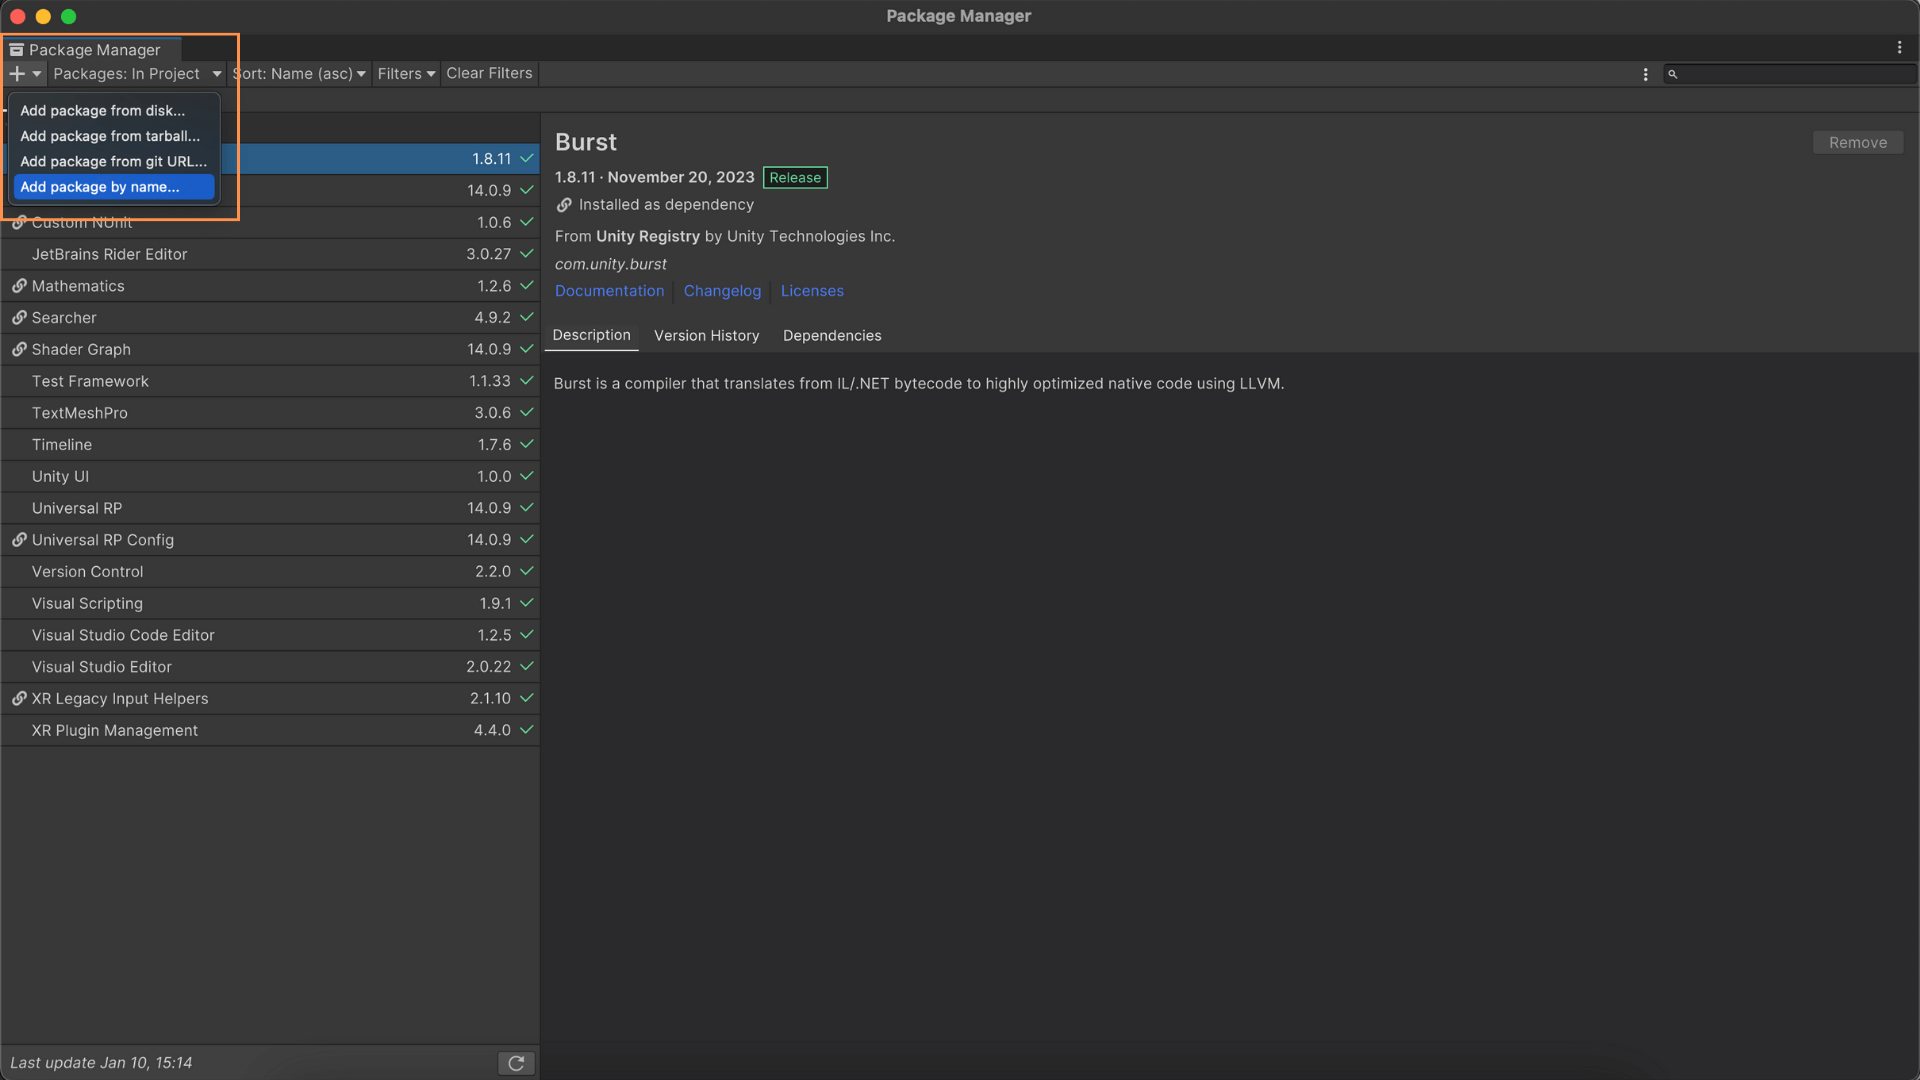
4 – Click on Window Menu > Package Manager > Add package by name…
- Navigate to the Window Menu and select Package Manager. Then, choose to add a package by name.
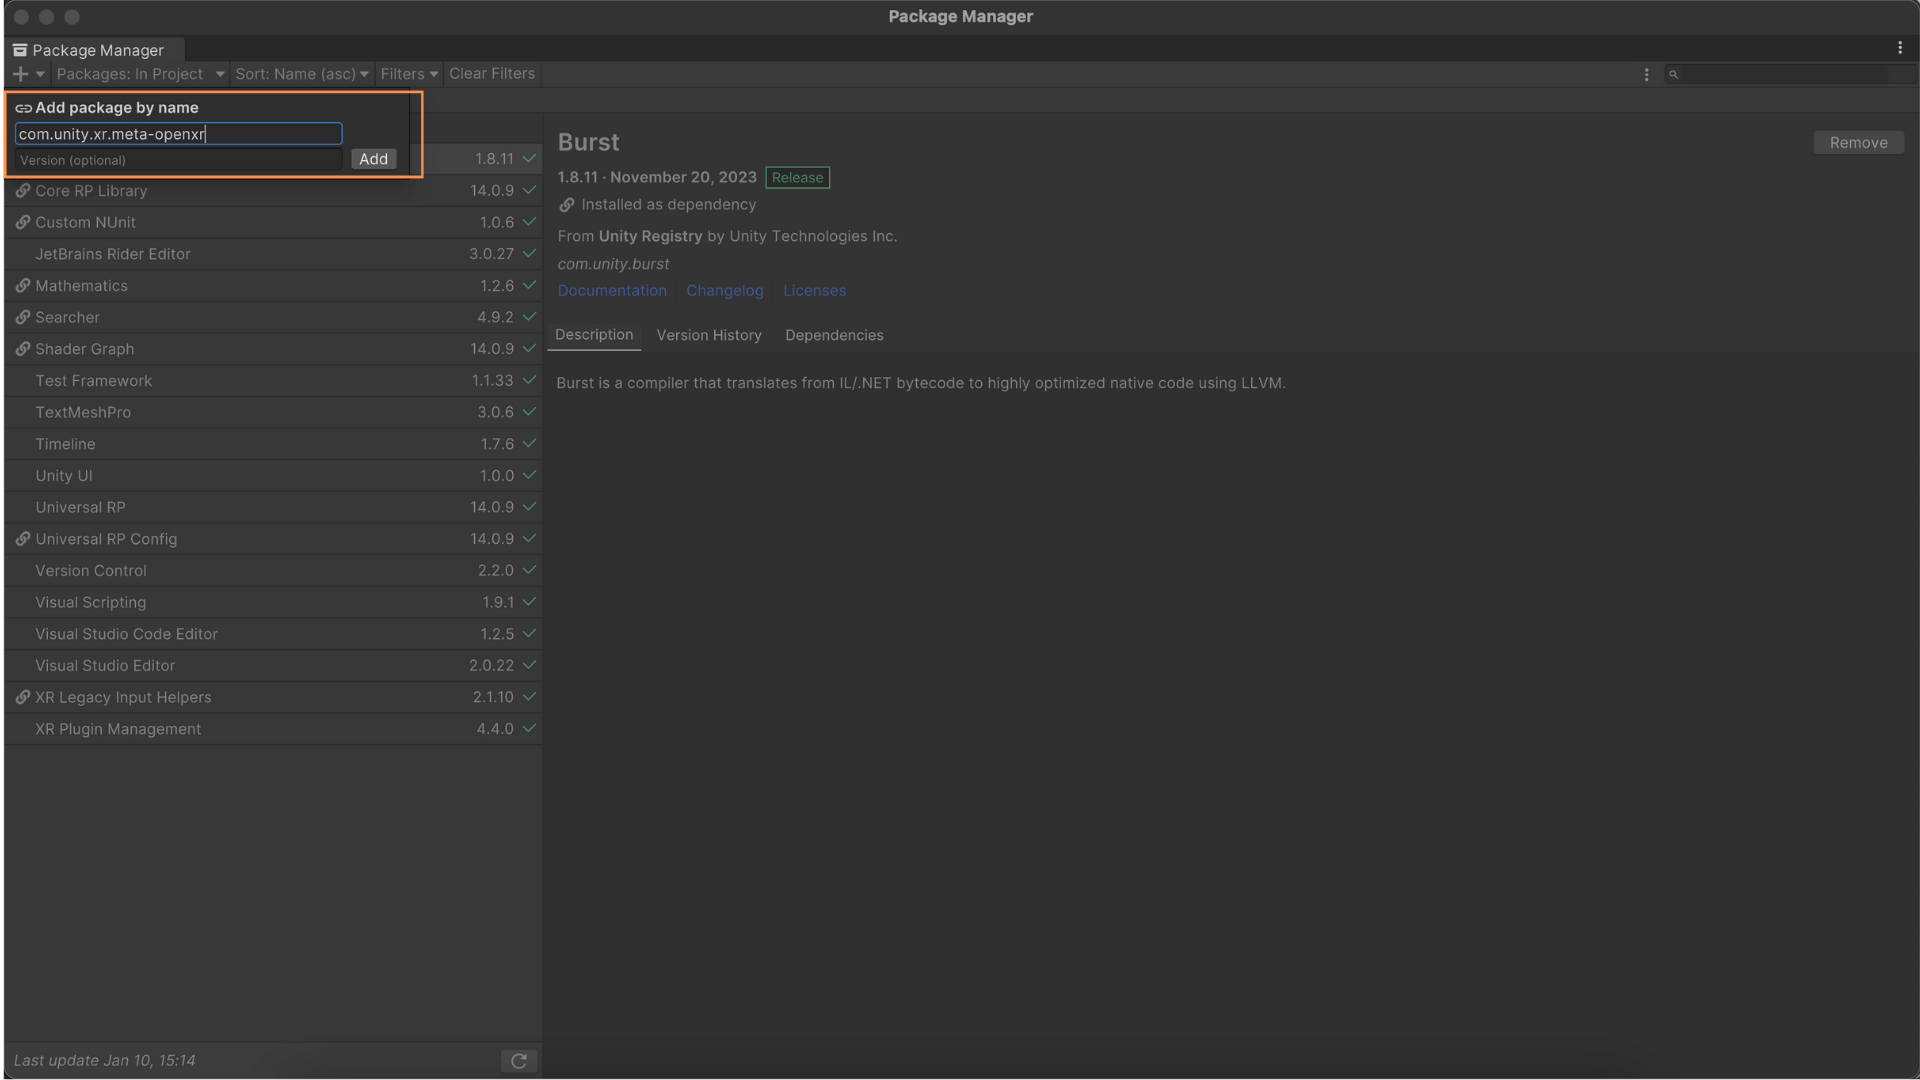
5 – Add Package Meta Open XR
- In the provided box, enter the package name: com.unity.xr.meta-openxr
As you import this package, it will include additional packages such as AR FOUNDATION and the New Input System. Be aware that a warning may prompt you to restart the editor due to the new input system, and in response, click Yes.

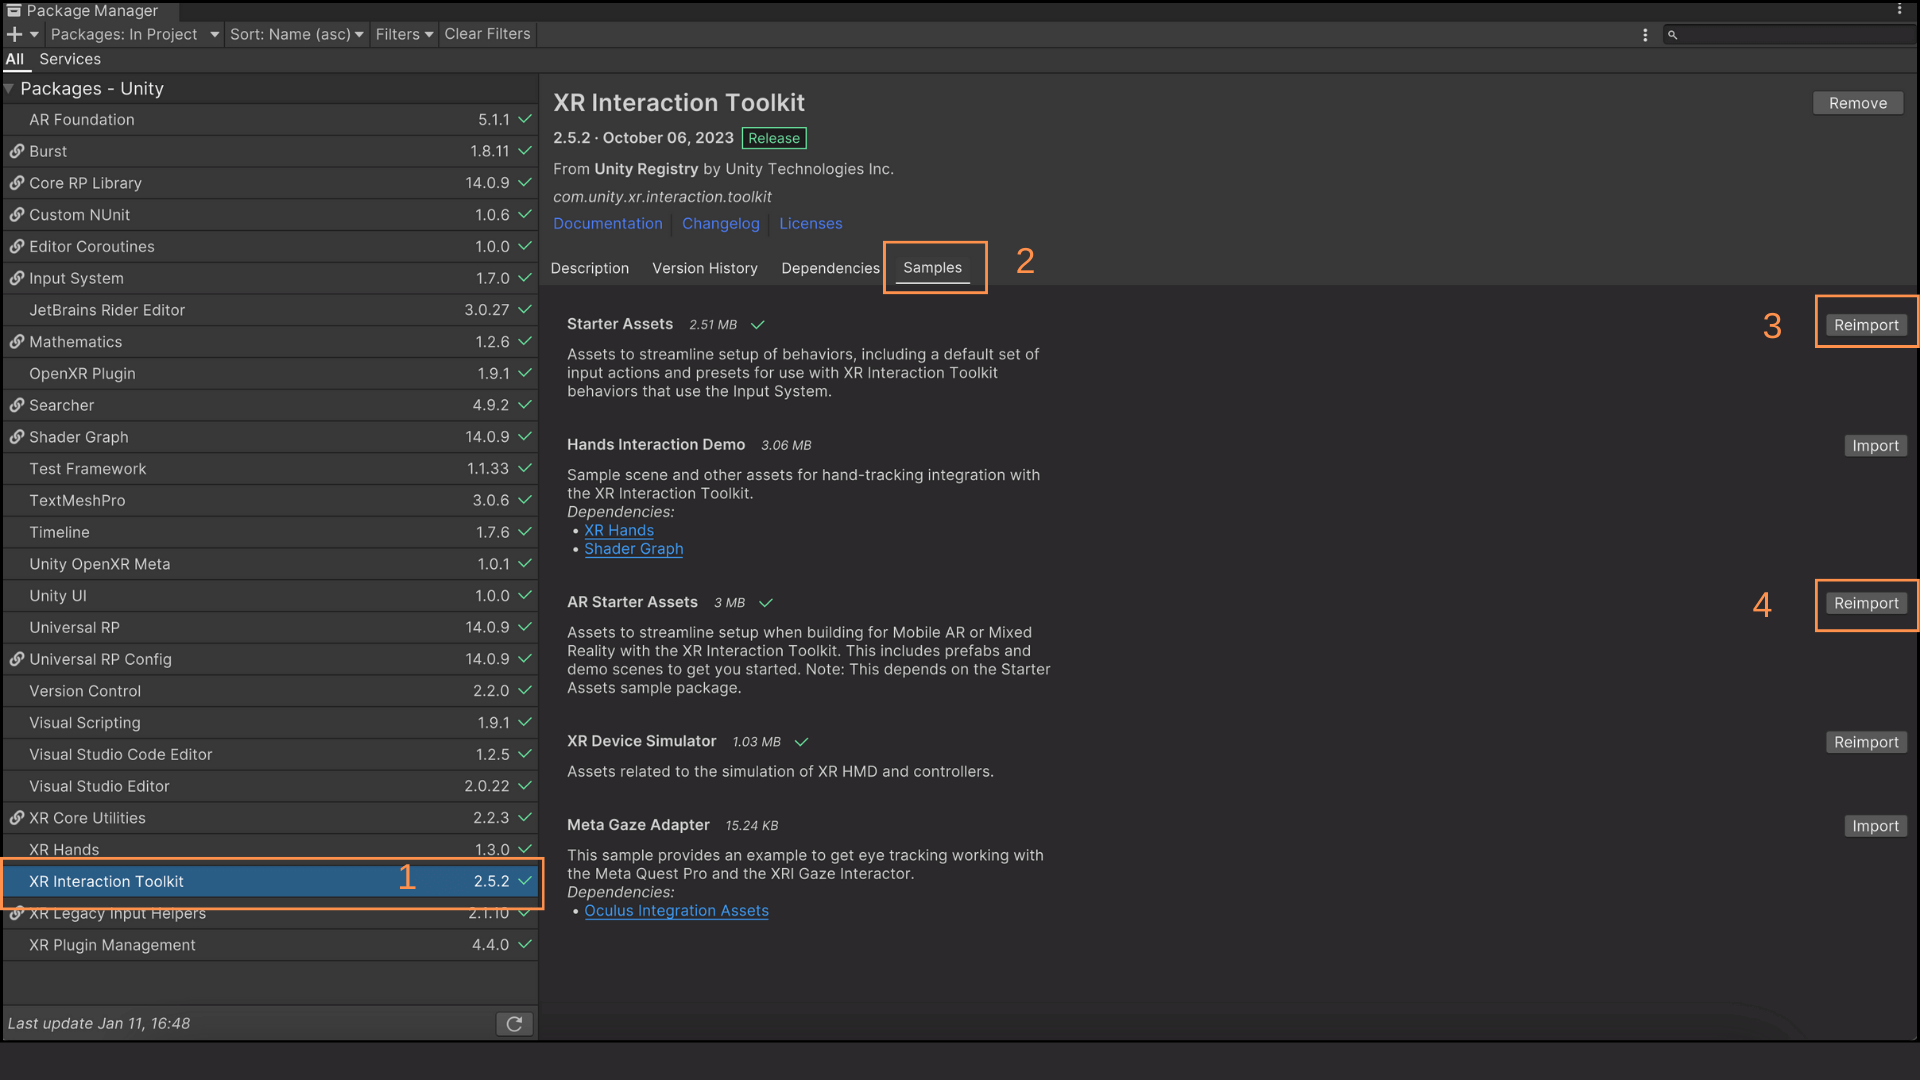
- Add XR Interaction Toolkit after importing, add the Samples :
- Starter Assets and AR StarterAssets for enhanced interaction features in Unity.
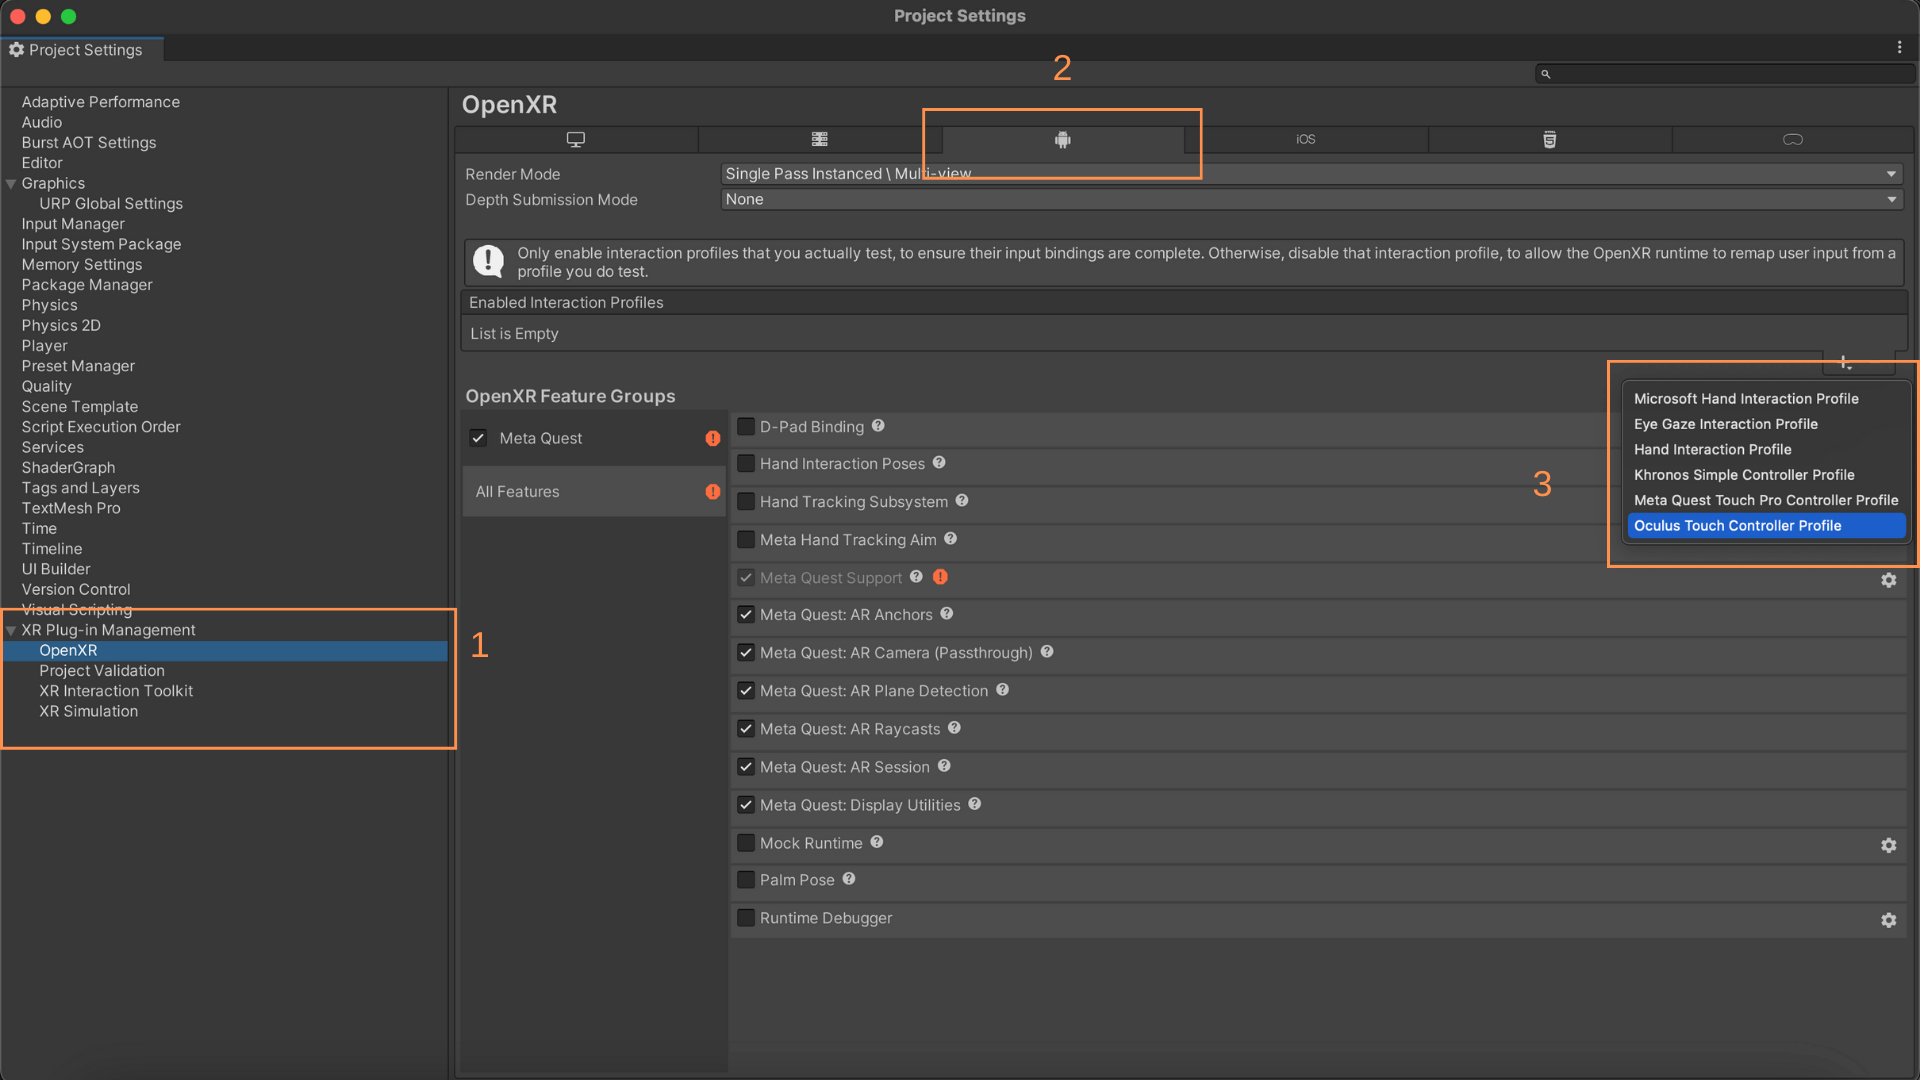
6 – Enabled Touch Interaction Profile
- OpenXR Settings: Under XR Plug-in Management, select OpenXR.
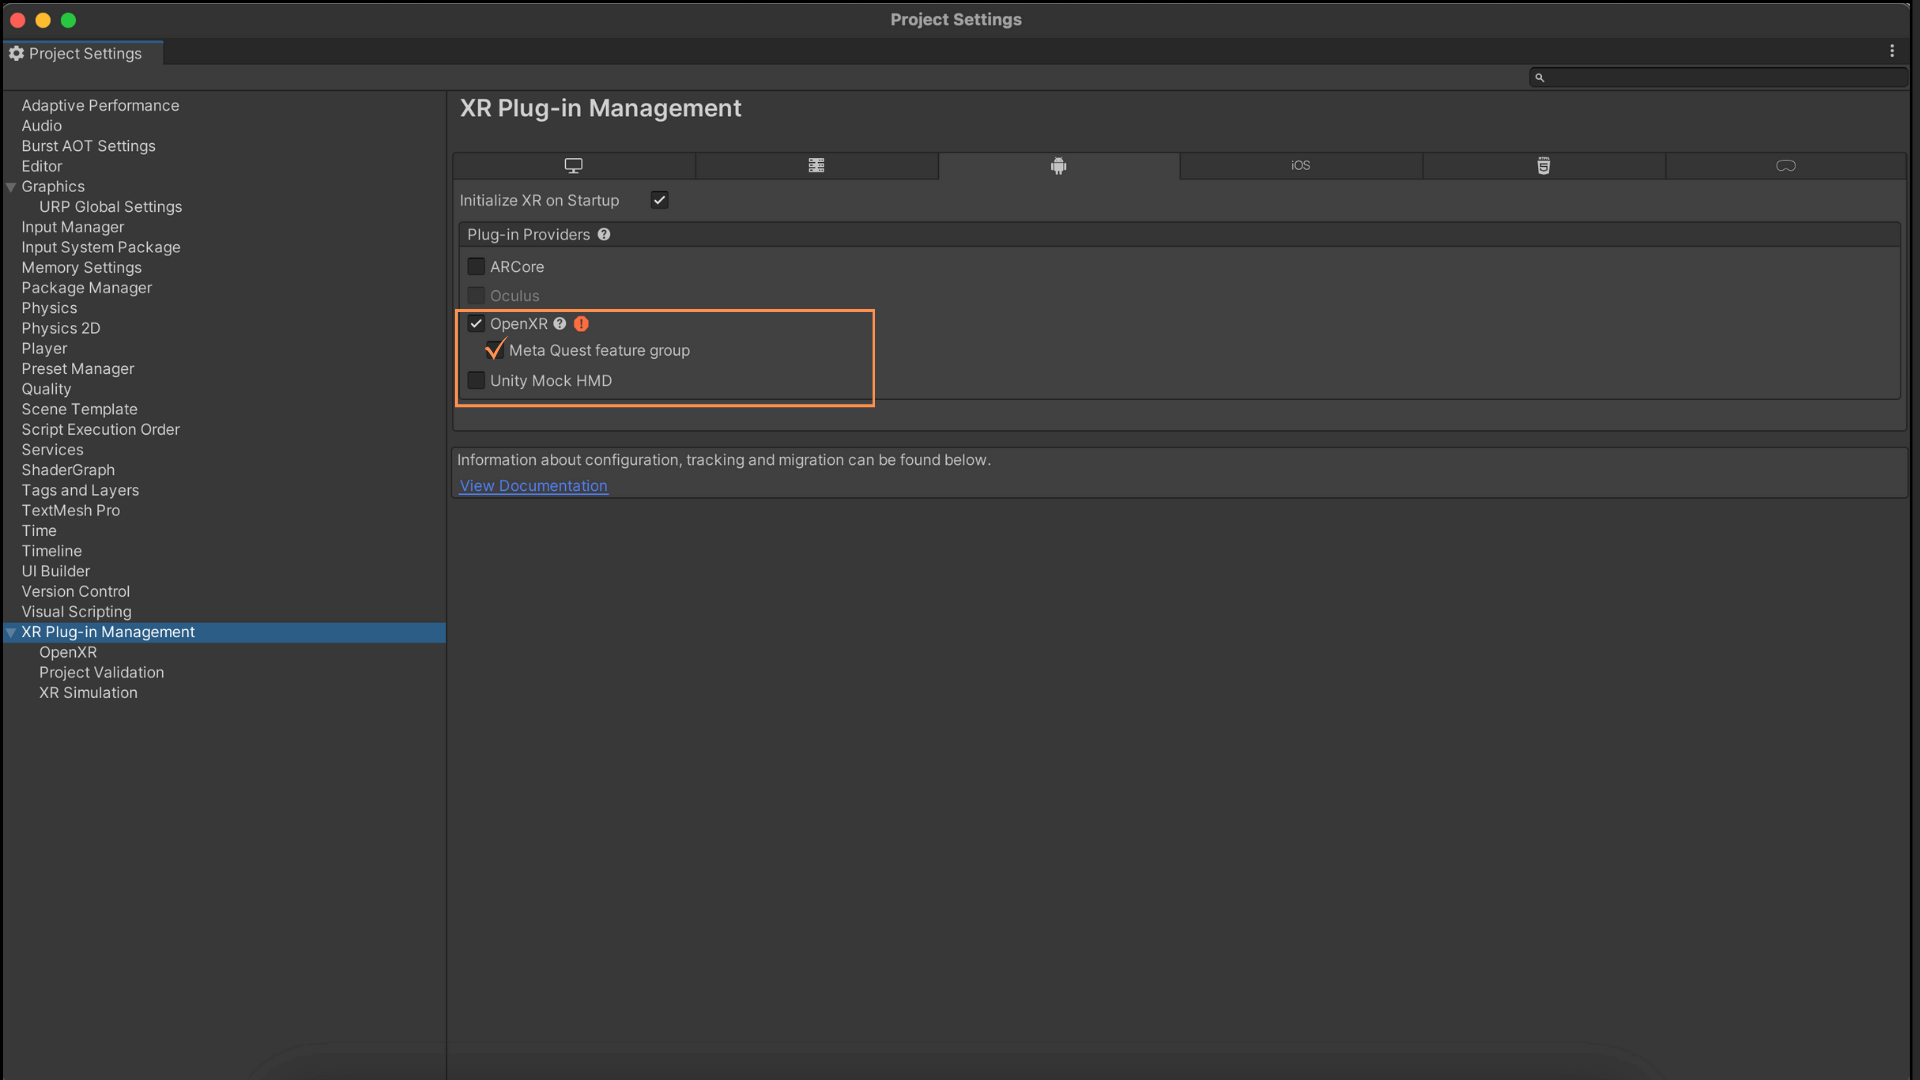
- Android Platform: Ensure you’re configuring settings for the Android platform. If not, switch to Android in Build Settings.
- Add Oculus Touch Interaction Profile: In the OpenXR settings for Android, include the Oculus Touch profile to enable touch interaction.
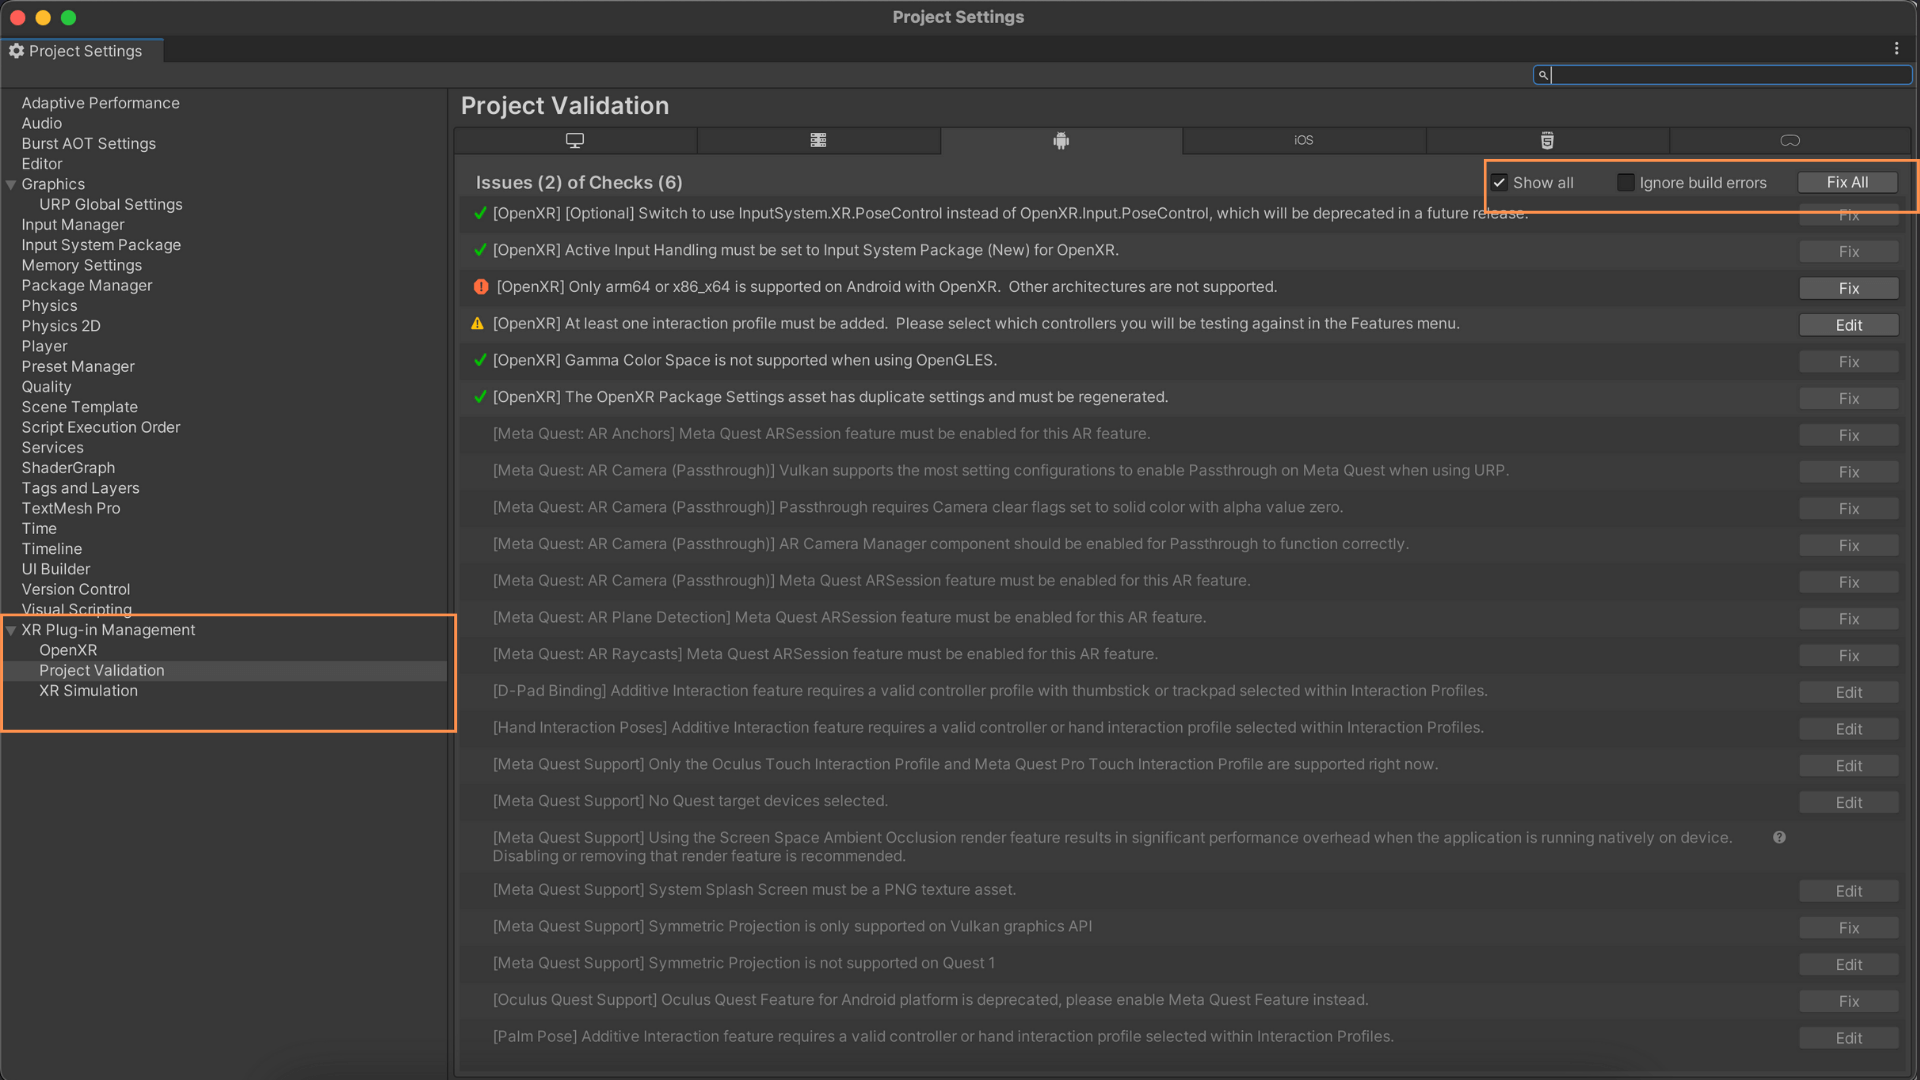
7 -Project Validations
In the Project Validation section, you might encounter warnings or errors. Click on Fix All to automatically address and resolve these issues.
2 Unity Scene Setup for Mixed Reality:
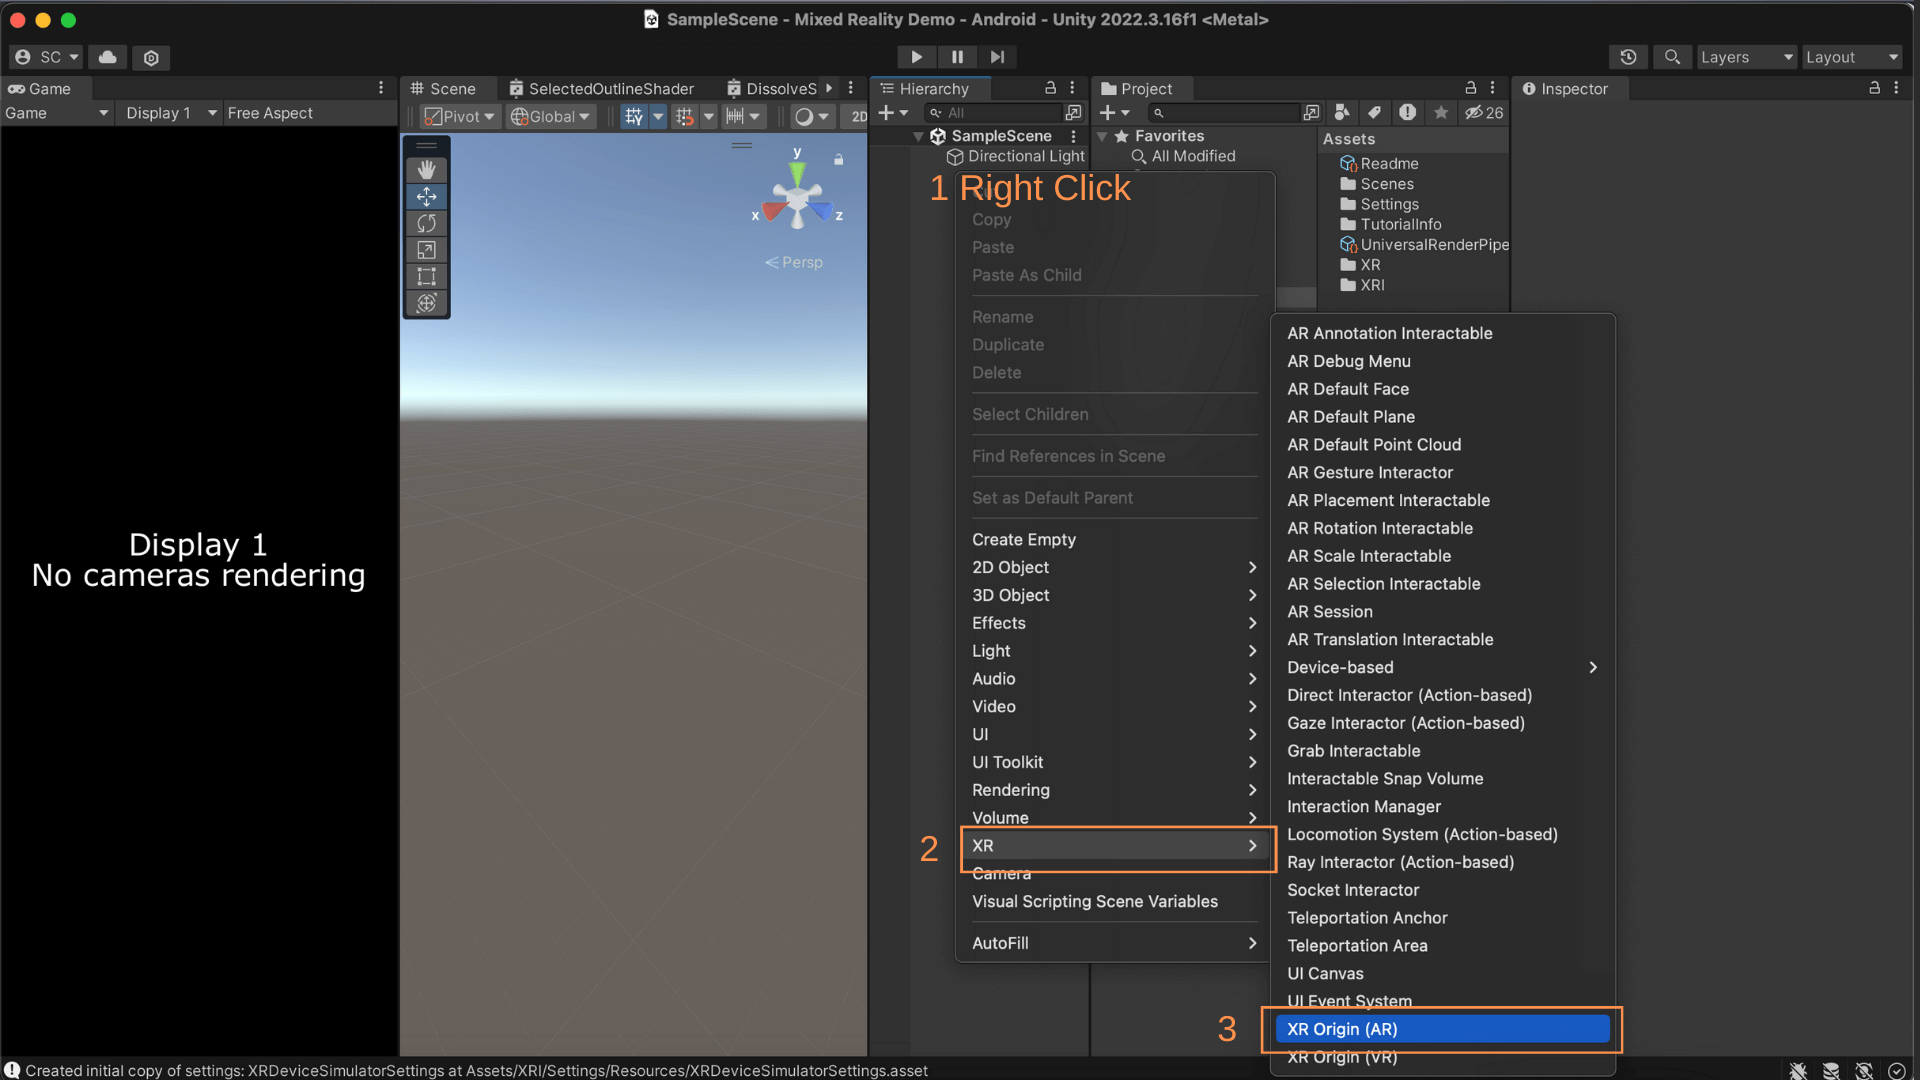
- Clean Scene Setup: Delete all objects in your Unity scene except for the Directional Light.
- Add XROrigin (AR): Add an XROrigin (AR) object, which automatically includes the XR Interaction Manager.
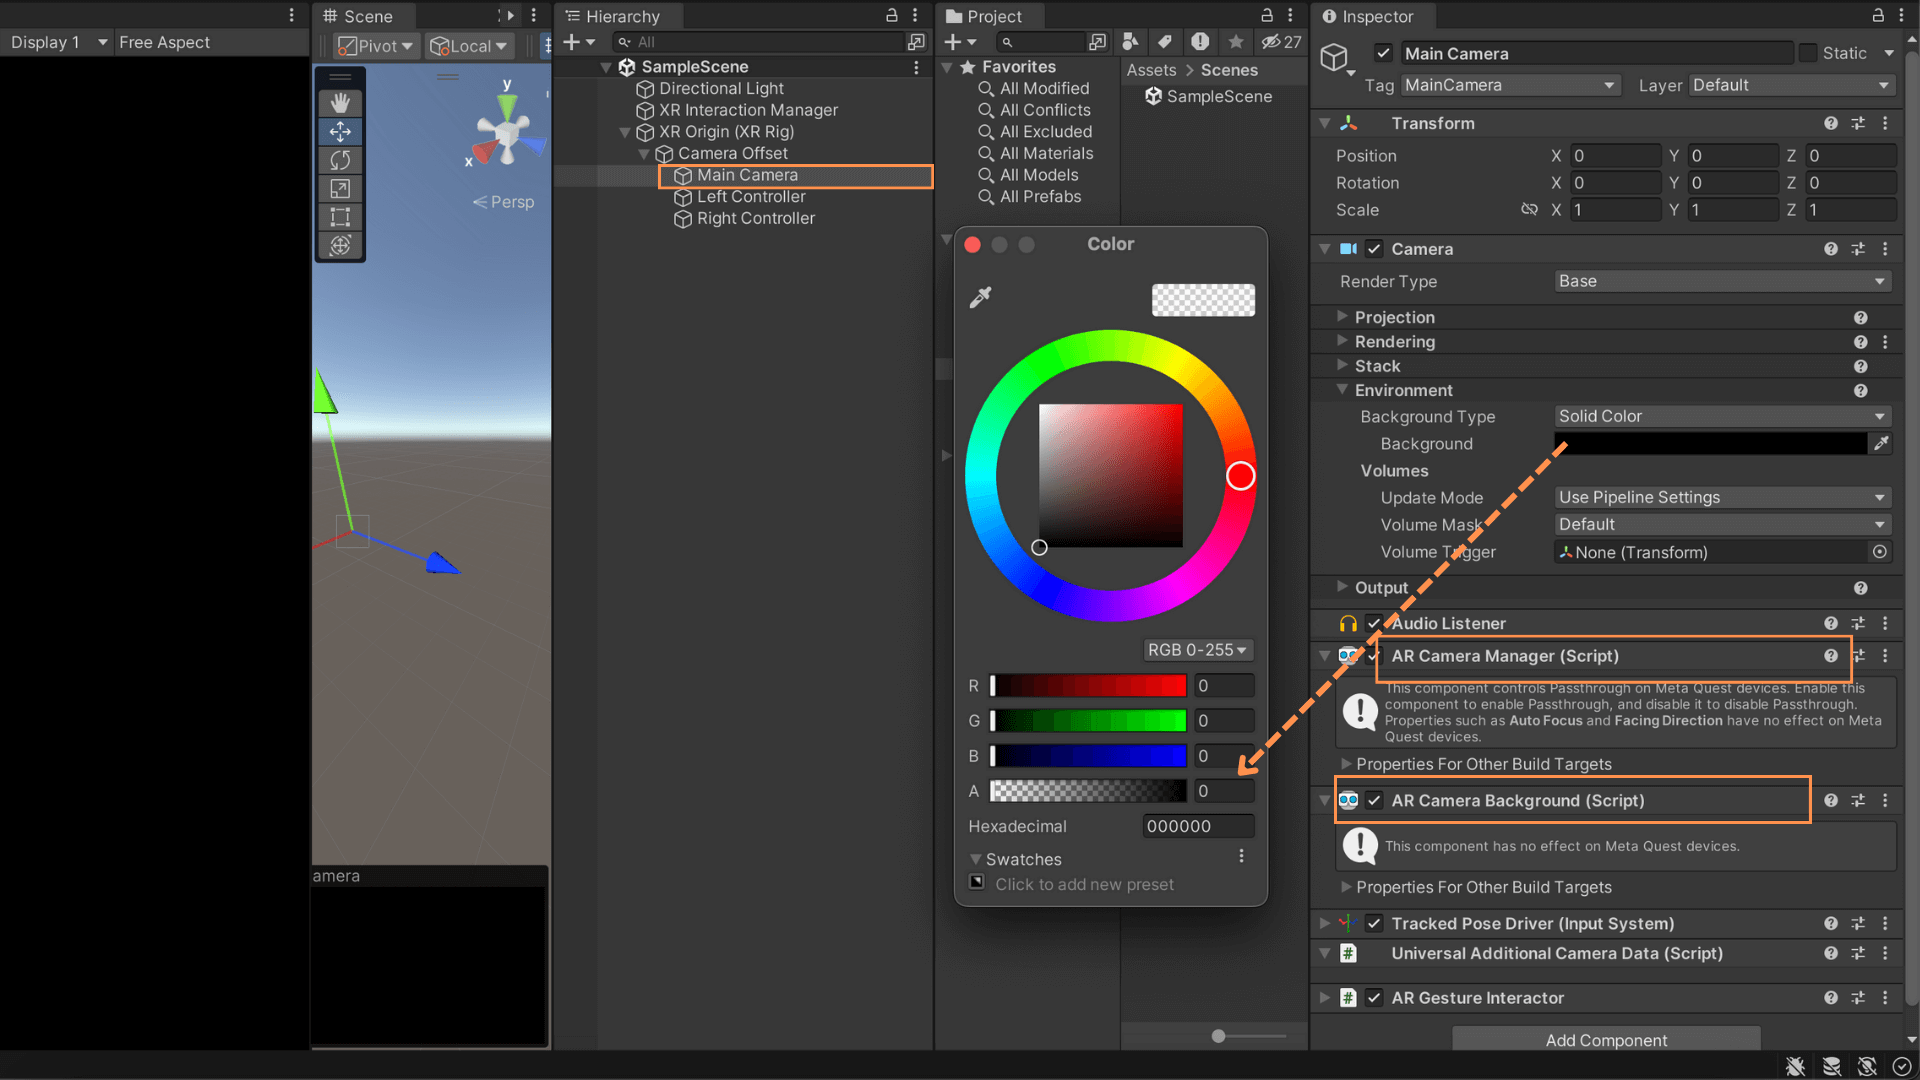
- Select XR Origin (XR Rig) > Camera Offset > Main Camera.
- Set Camera Solid color alpha to 0 for passthrough.
- Confirm the presence of AR Camera Manager and AR Camera Background components.
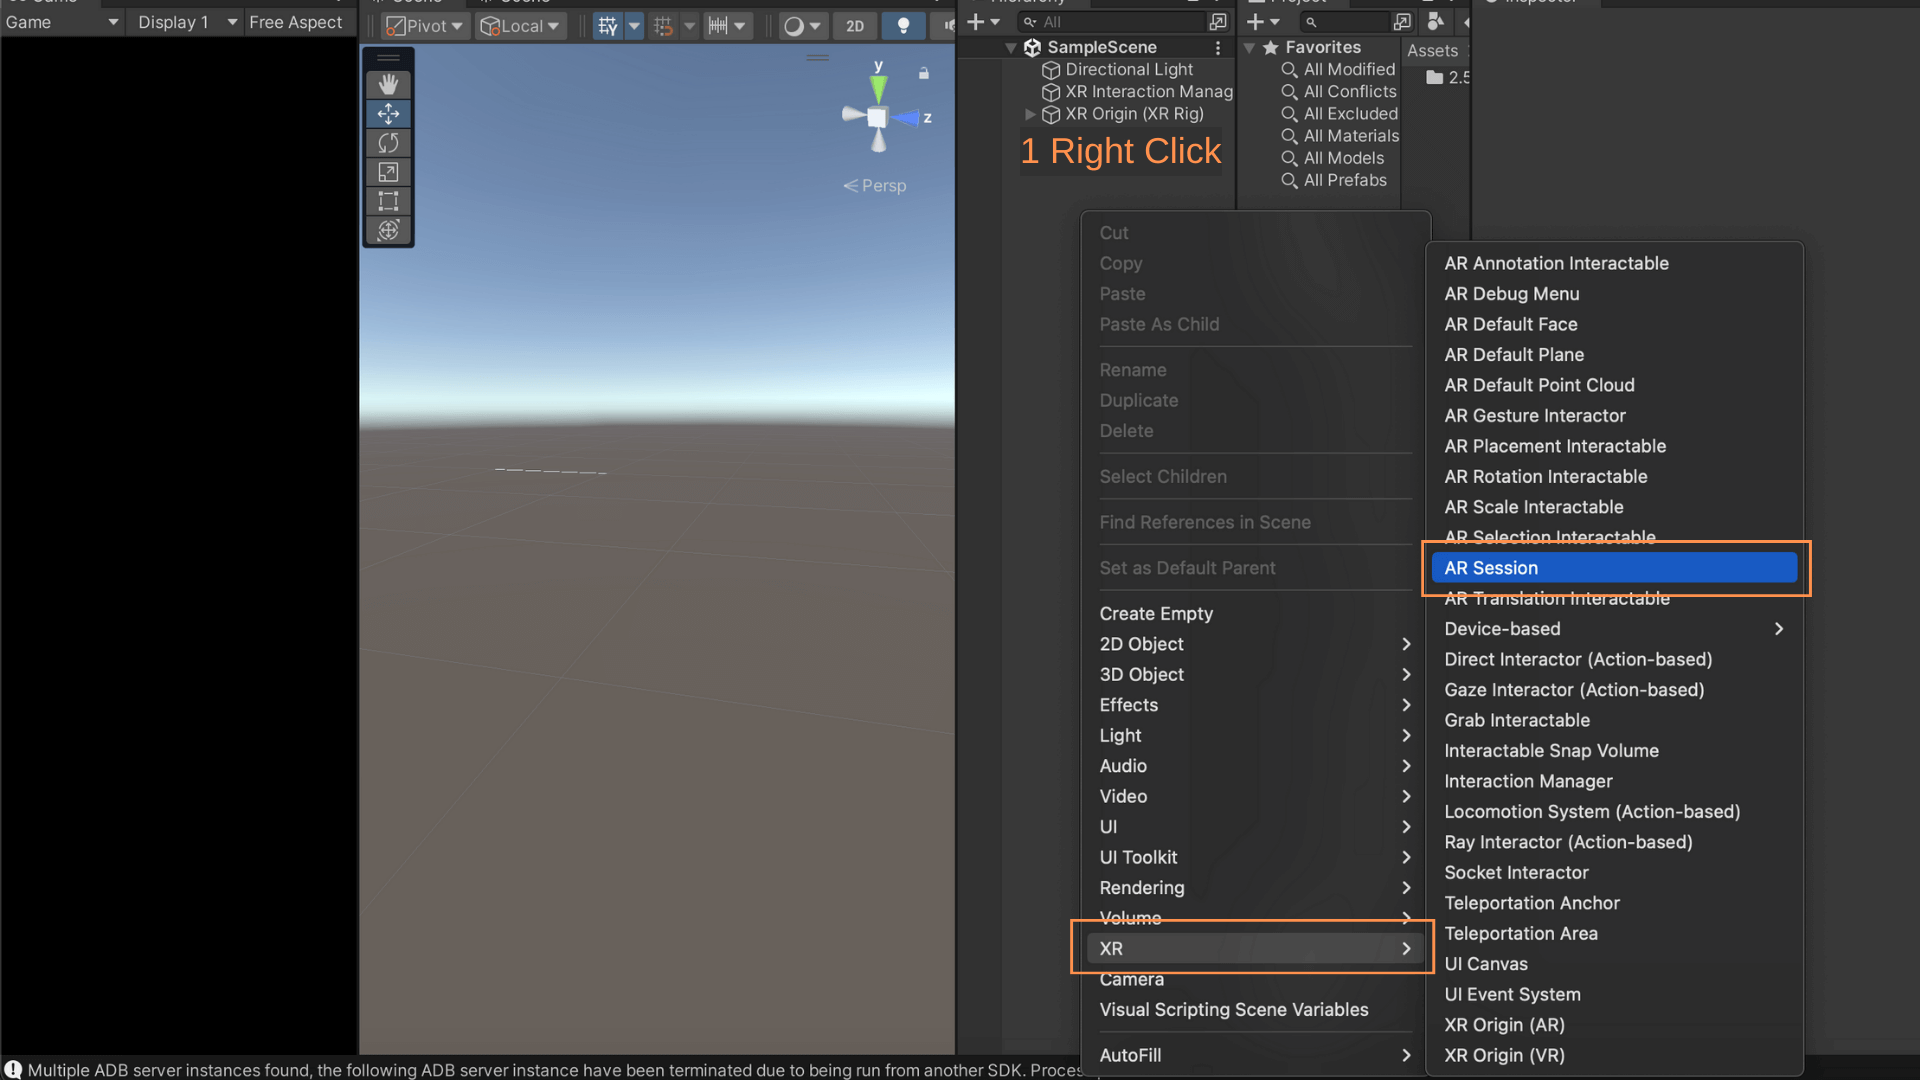
3 Add ARSession:
- Add an ARSession object to enable mixed reality AR tracking.
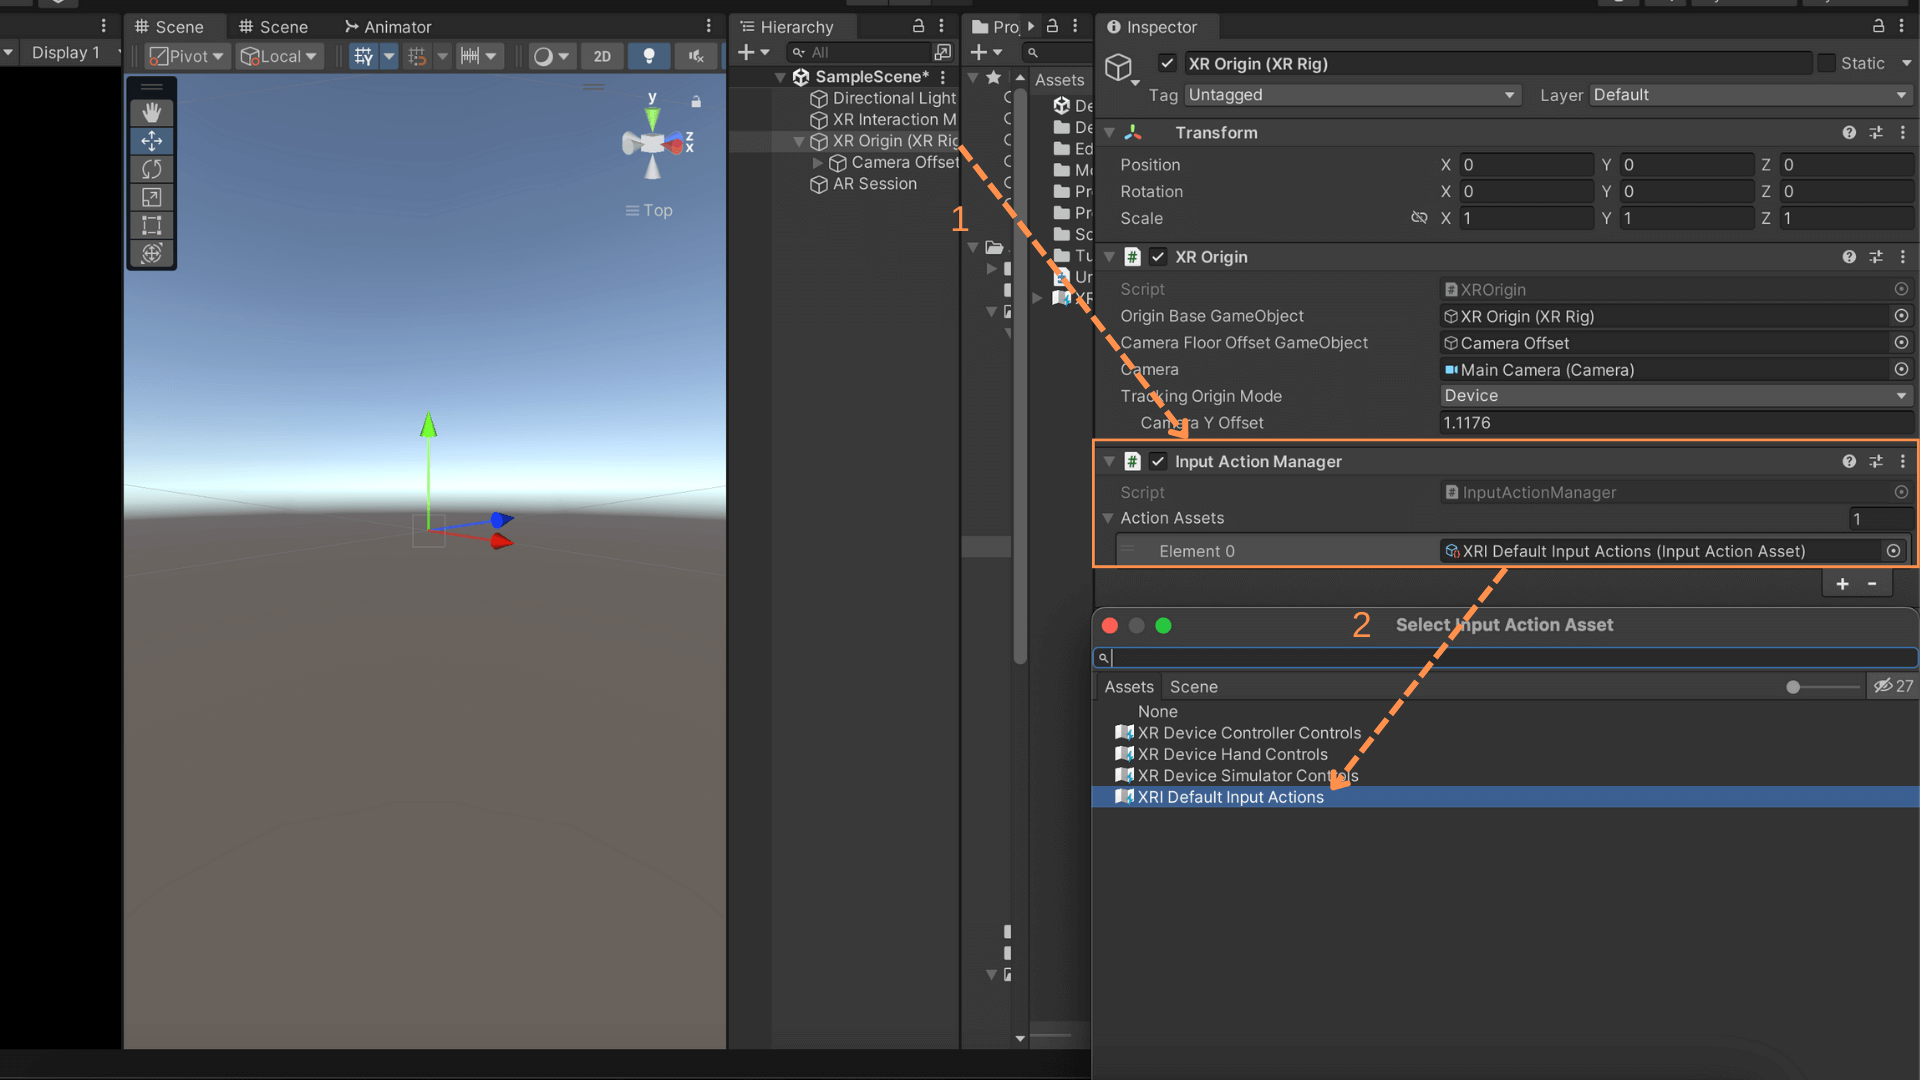
4 Configure XR Input:
- Select the XROrigin in the scene.
- In the Inspector, add the Input Action Manager component.
- Provide a reference to the action assets: XRI Default Input Actions.
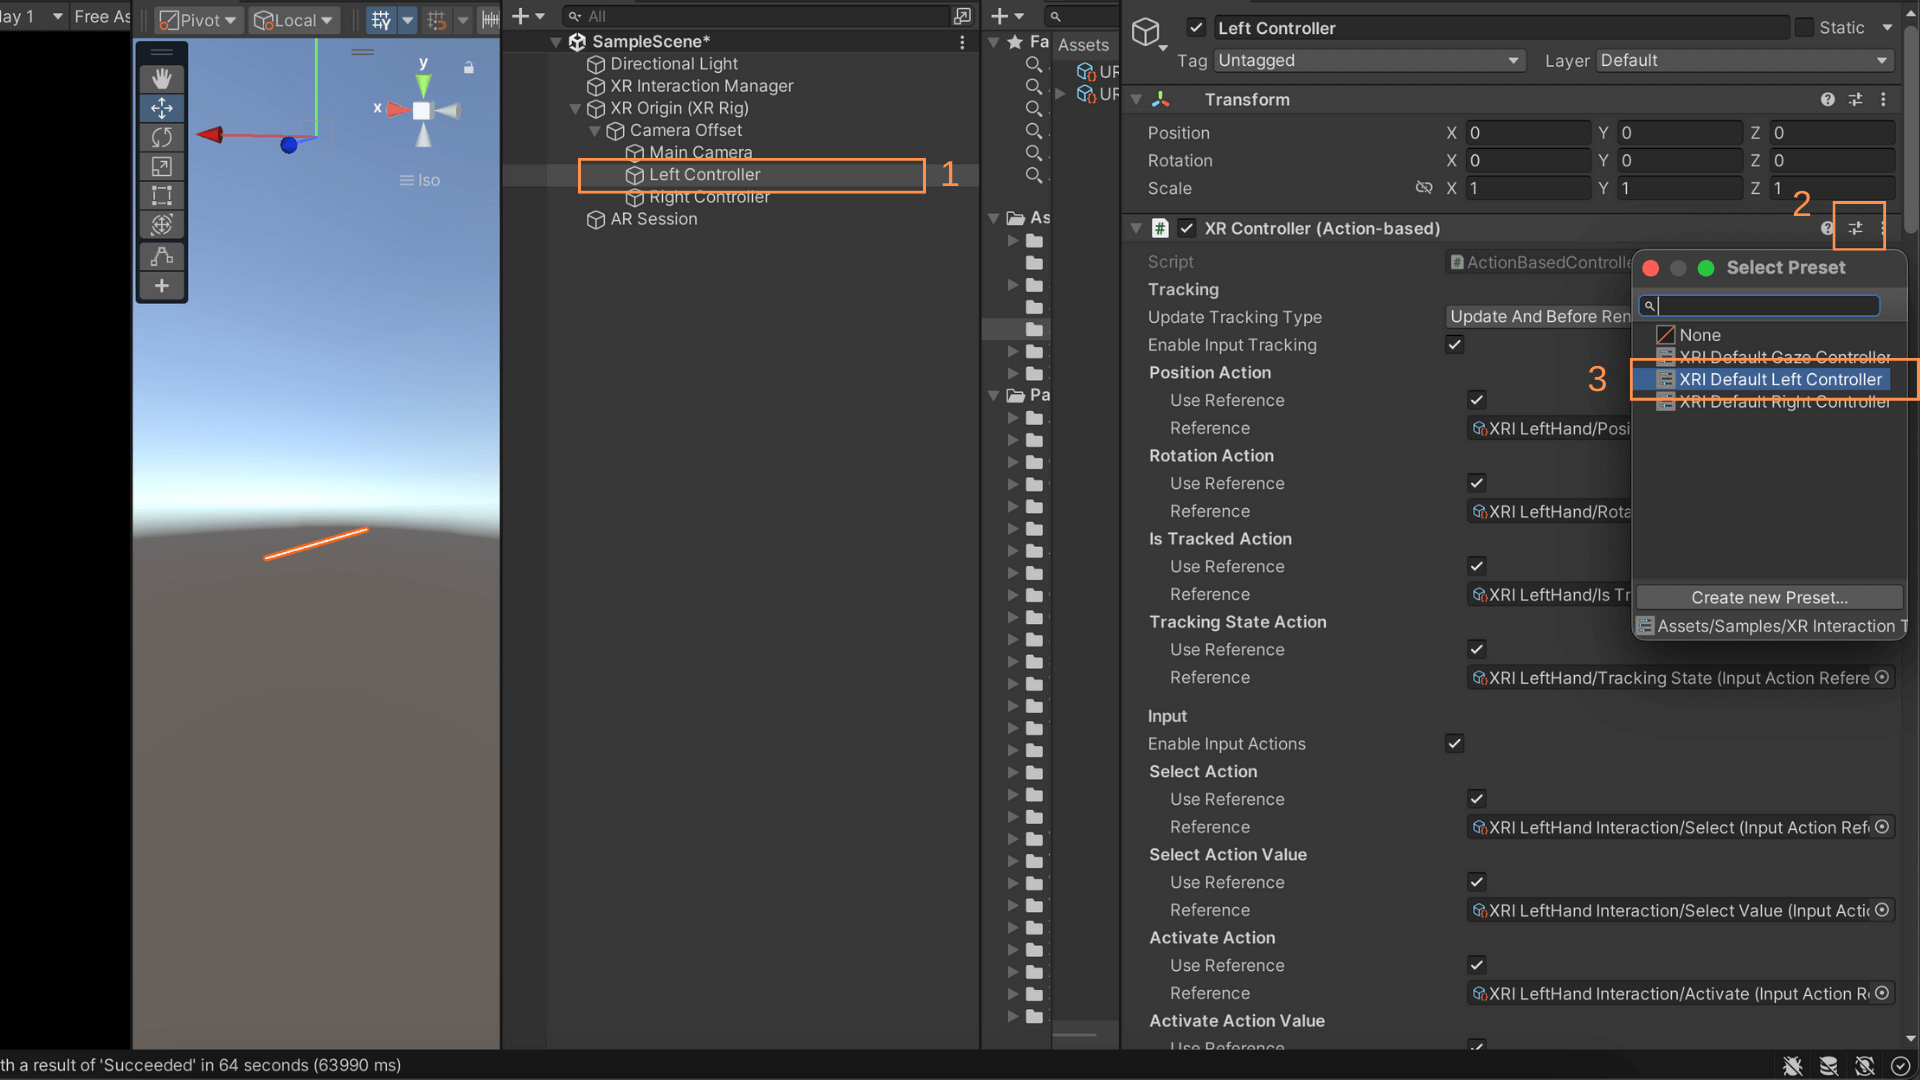
- Navigate to the XR Rig > Camera Offset > Left Controller.
- In the Inspector the XR Controller (Action-based) component, on the right side, click on the icon.
- Choose XRI Default Left Controller for the Left controller.
- Similarly, select XRI Default Right Controller for the Right controller.
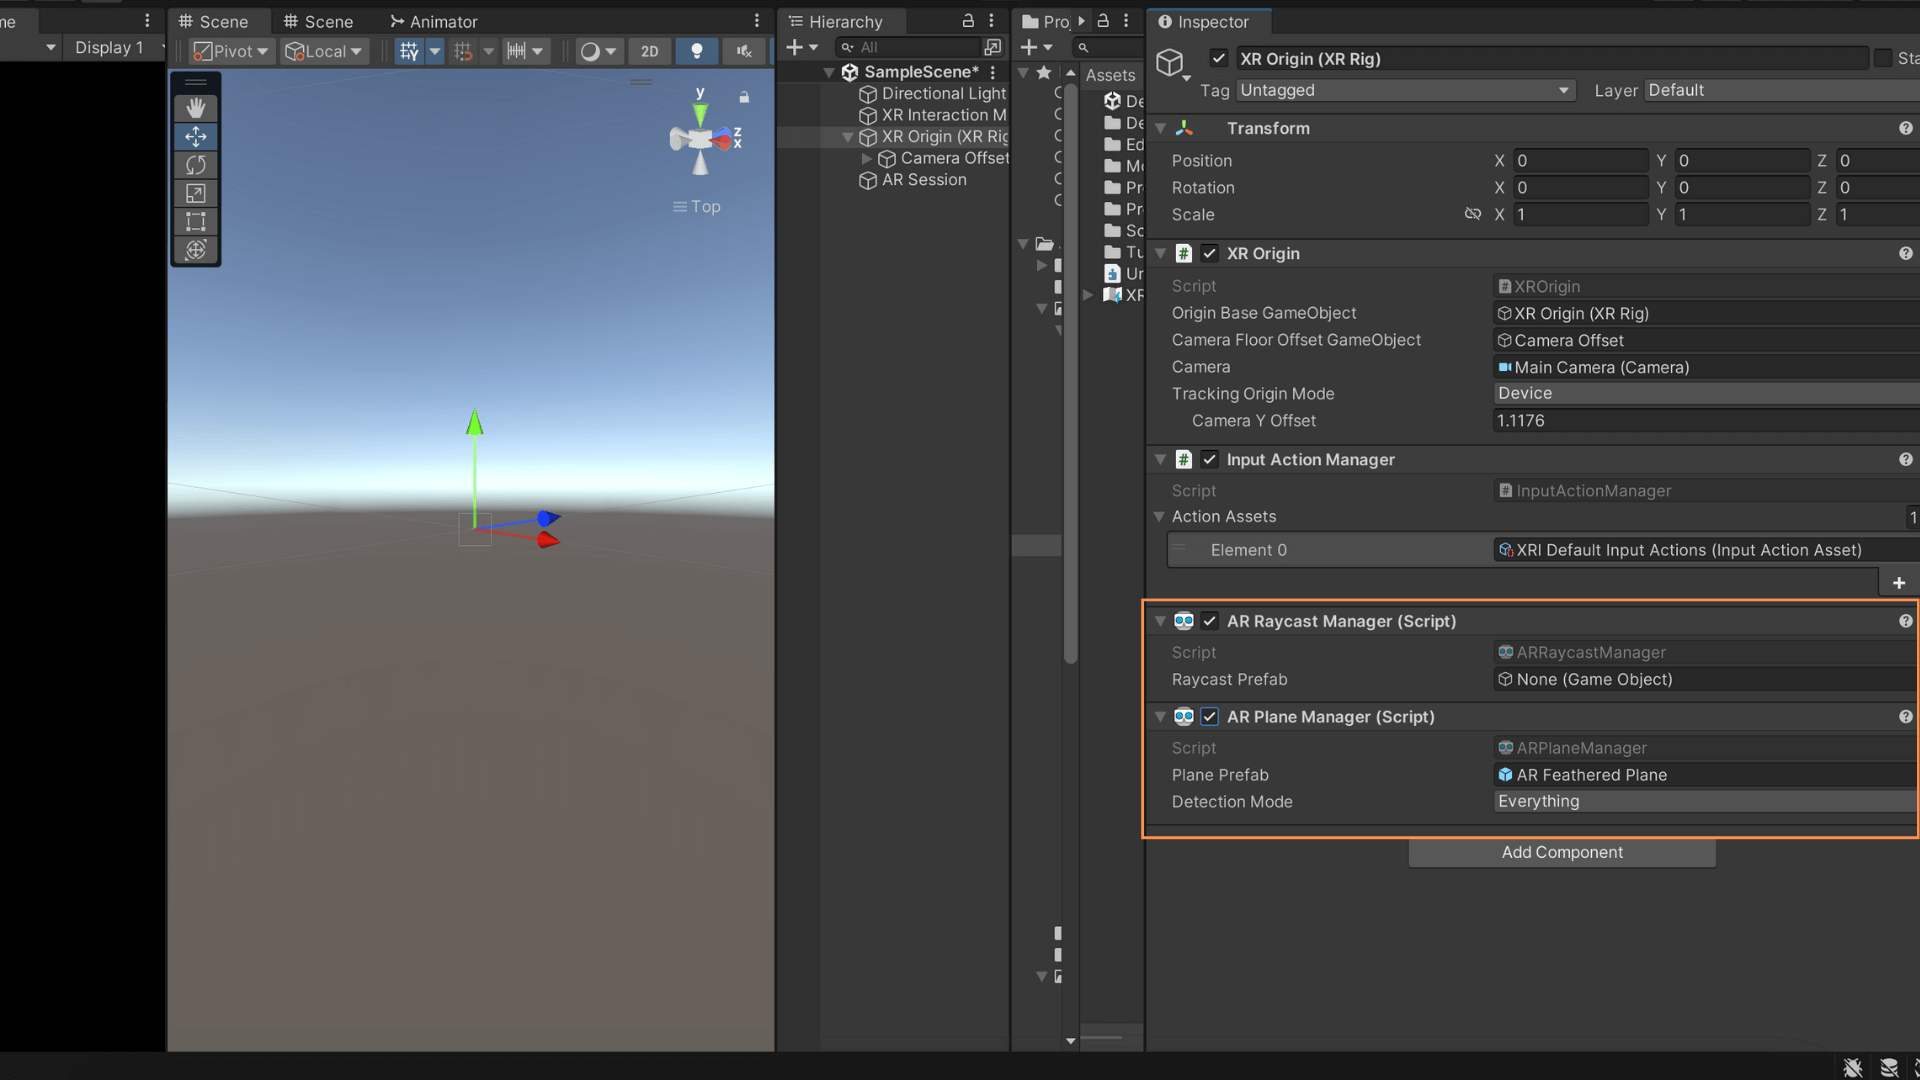
5 AR Raycast and Plane Management:
- Add AR Raycast Manager and AR Plane Manager components to the XROrigin.
- In AR Plane Manager, set the Plane Prefab Reference to an AR Feathered Plane prefab.
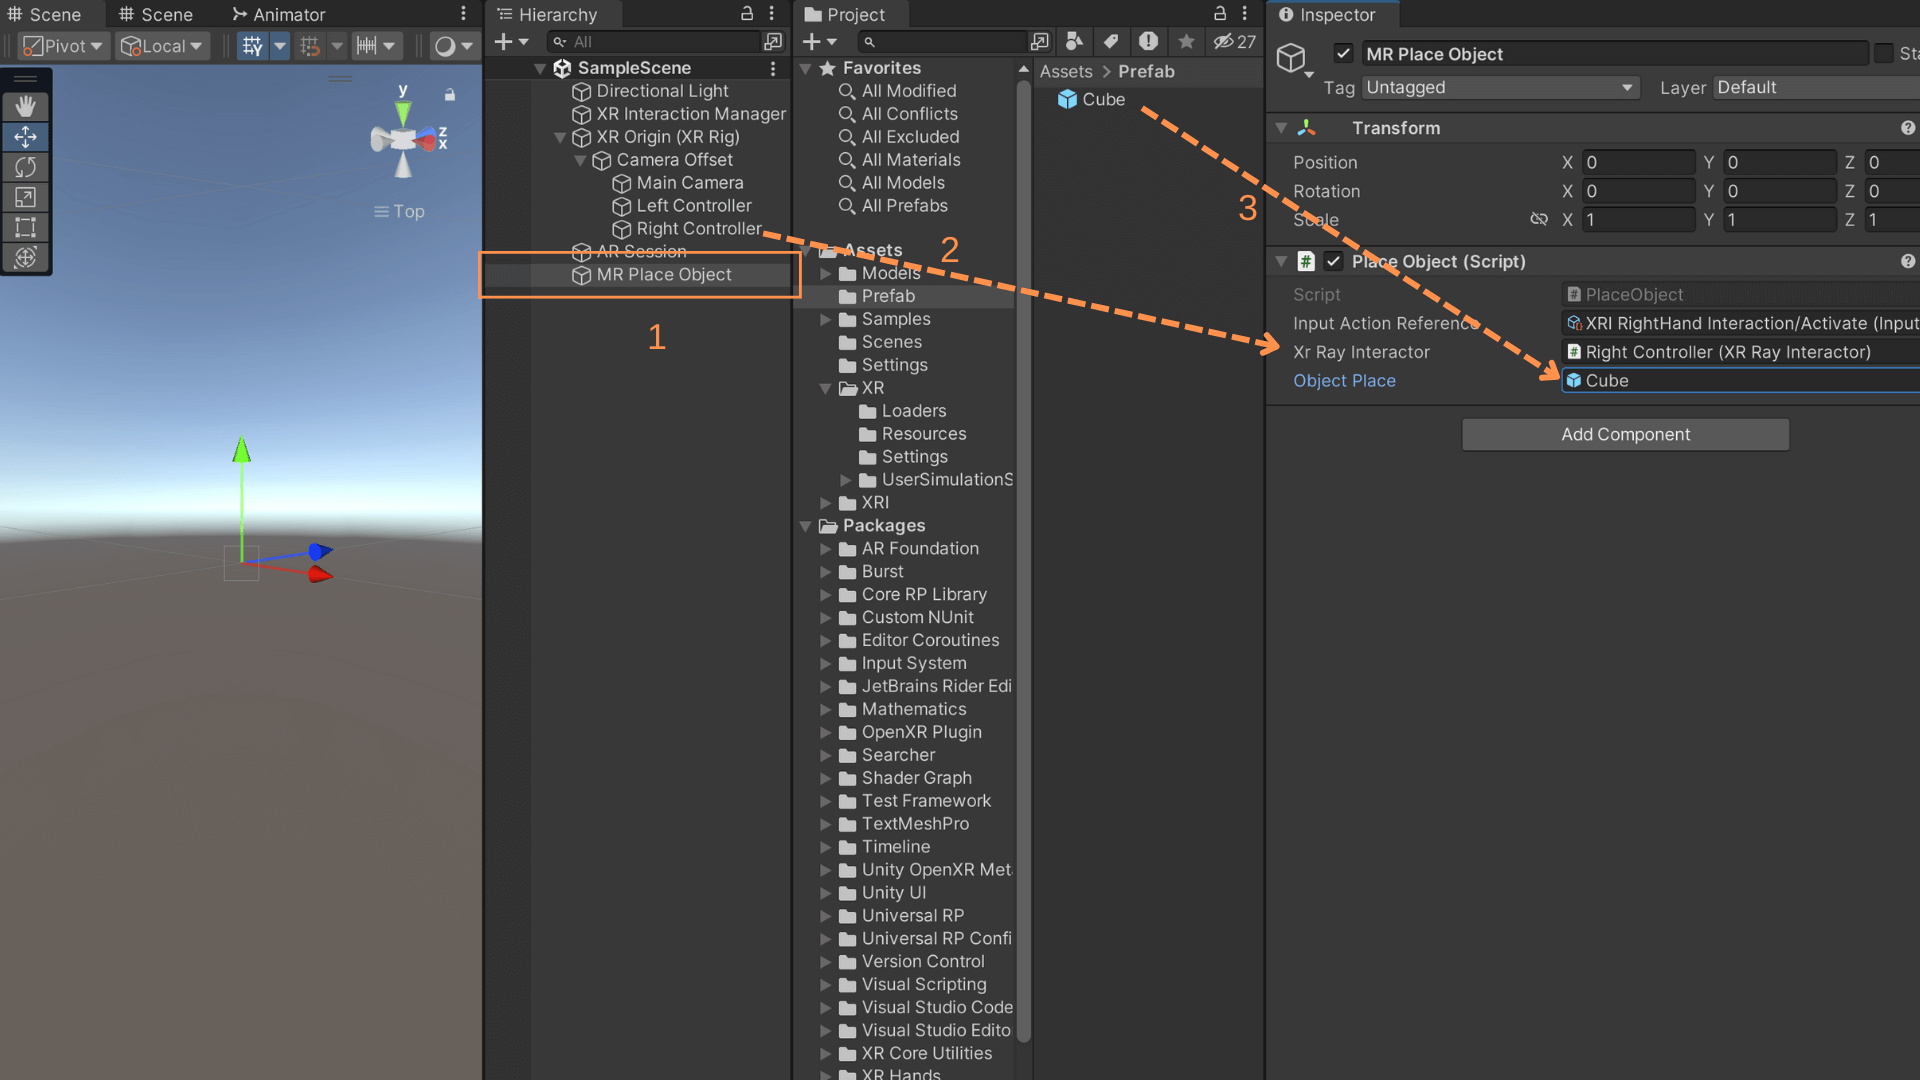
6 Create Placement Object:
- Create an empty object in the scene (e.g., MR Place Object).
- Create a new C# script, e.g., PlaceObject, and attach it to MR Place Object.
- In the script:
using UnityEngine;
using UnityEngine.InputSystem;
using UnityEngine.XR.ARFoundation;
using UnityEngine.XR.Interaction.Toolkit;

public class PlaceObject : MonoBehaviour
{
    [SerializeField] private InputActionReference inputActionReference;
    [SerializeField] private XRRayInteractor xrRayInteractor;
    [SerializeField] private GameObject objectToPlace;
    private GameObject placedObject = null;
    [SerializeField] private ARPlaneManager arPlaneManager;
    private void OnEnable()
    {
        inputActionReference.action.performed += ActionOnperformed;
    }

    private void OnDisable()
    {
        inputActionReference.action.performed -= ActionOnperformed;
    }

    private void ActionOnperformed(InputAction.CallbackContext obj)
    {
        if (xrRayInteractor.TryGetCurrentARRaycastHit(out ARRaycastHit hit))
        {
            if (placedObject == null)
            {
                placedObject = Instantiate(objectToPlace, hit.pose.position, hit.pose.rotation);
                DisableAllPlanes();
            }
            else
            {
                placedObject.transform.position = hit.pose.position;
                placedObject.transform.rotation = hit.pose.rotation;
            }
        }
    }

    public void DisableAllPlanes()
    {
        arPlaneManager.enabled = false;
        foreach (ARPlane trackable in arPlaneManager.trackables)
        {
            trackable.gameObject.SetActive(false);
        }
    }
}
Add a reference to InputActionReference for the right controller’s Activate button.
- Reference the XRRayInteractor (use the right-hand controller or adjust as needed).
- Select the prefab you want to spawn when the Activate button is pressed.
These steps establish the foundational elements for a mixed reality scene in Unity, incorporating AR tracking, raycasting, and object placement based on controller input. Customize references and prefabs according to your specific project requirements.
Optimize graphics for Meta Quest 3:
- In Player Settings, under Graphics Scriptable Render Pipeline, choose URP-Balanced.
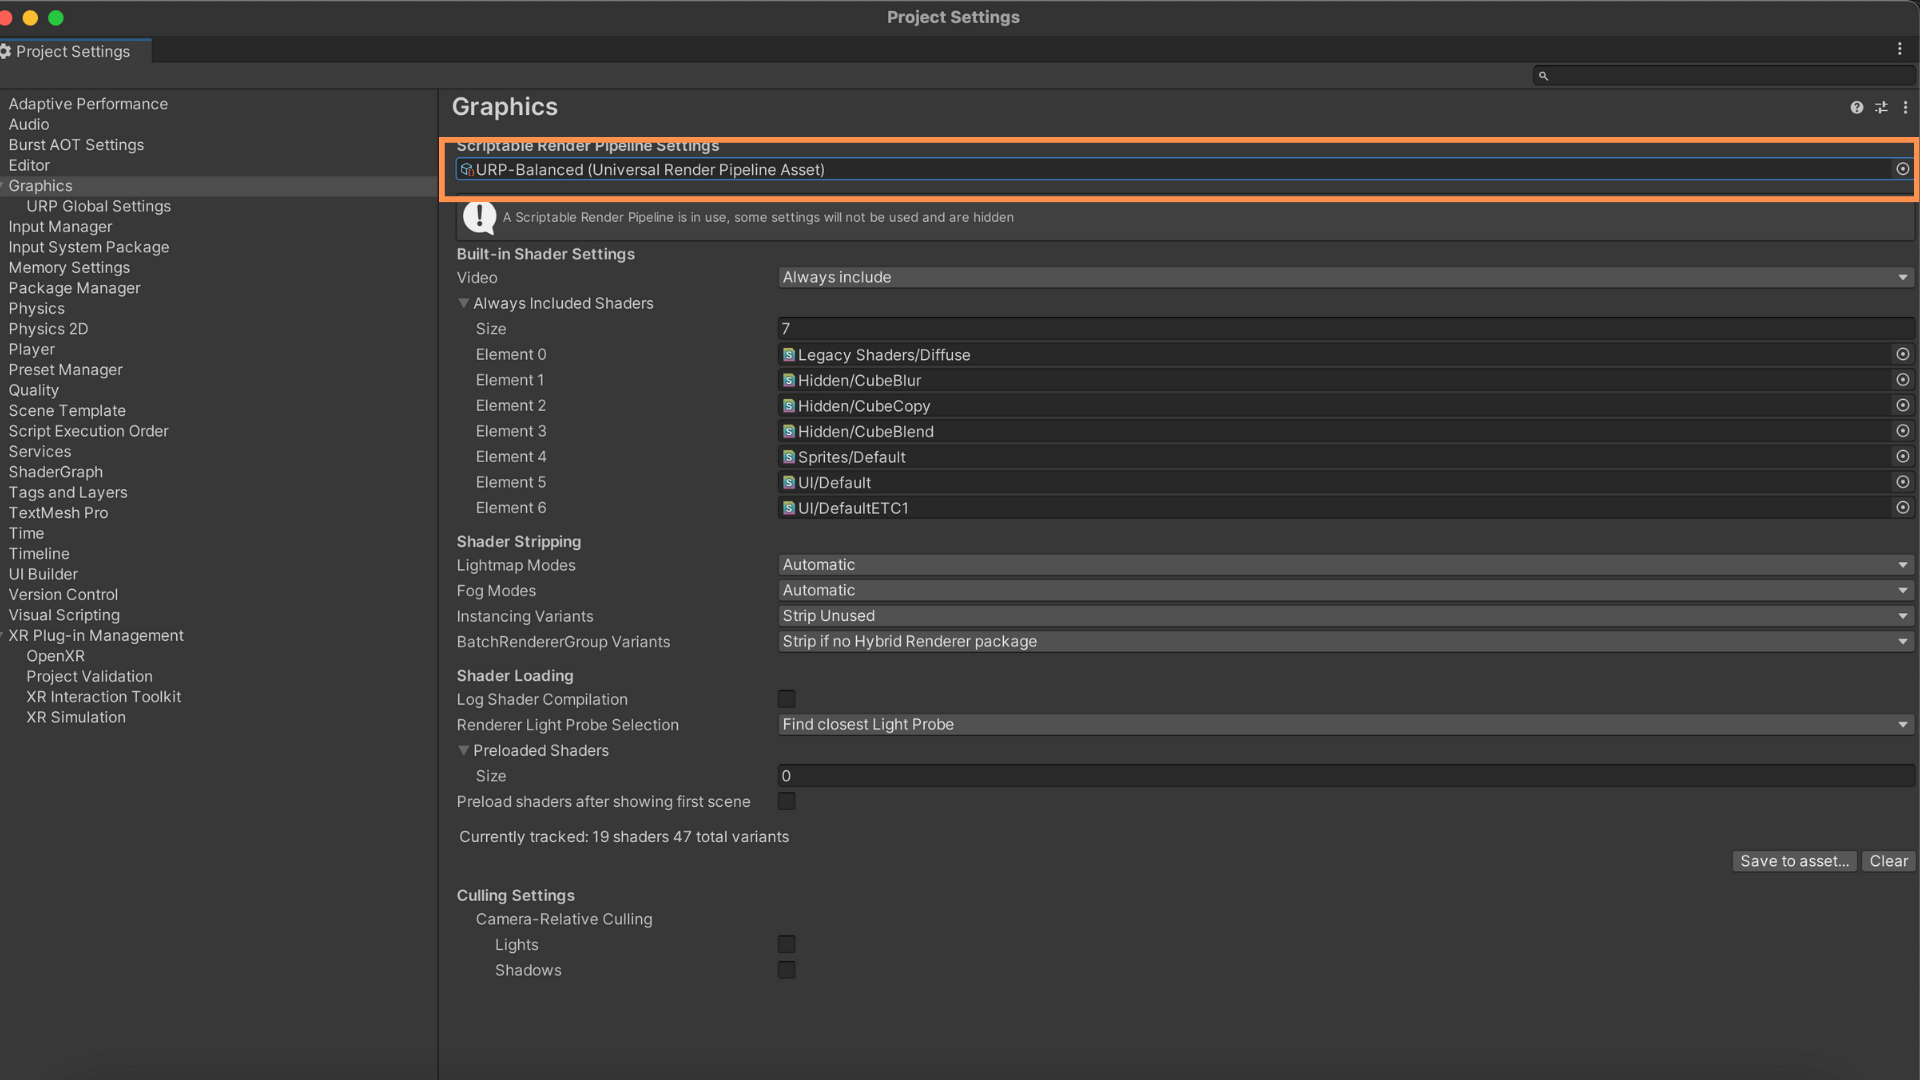
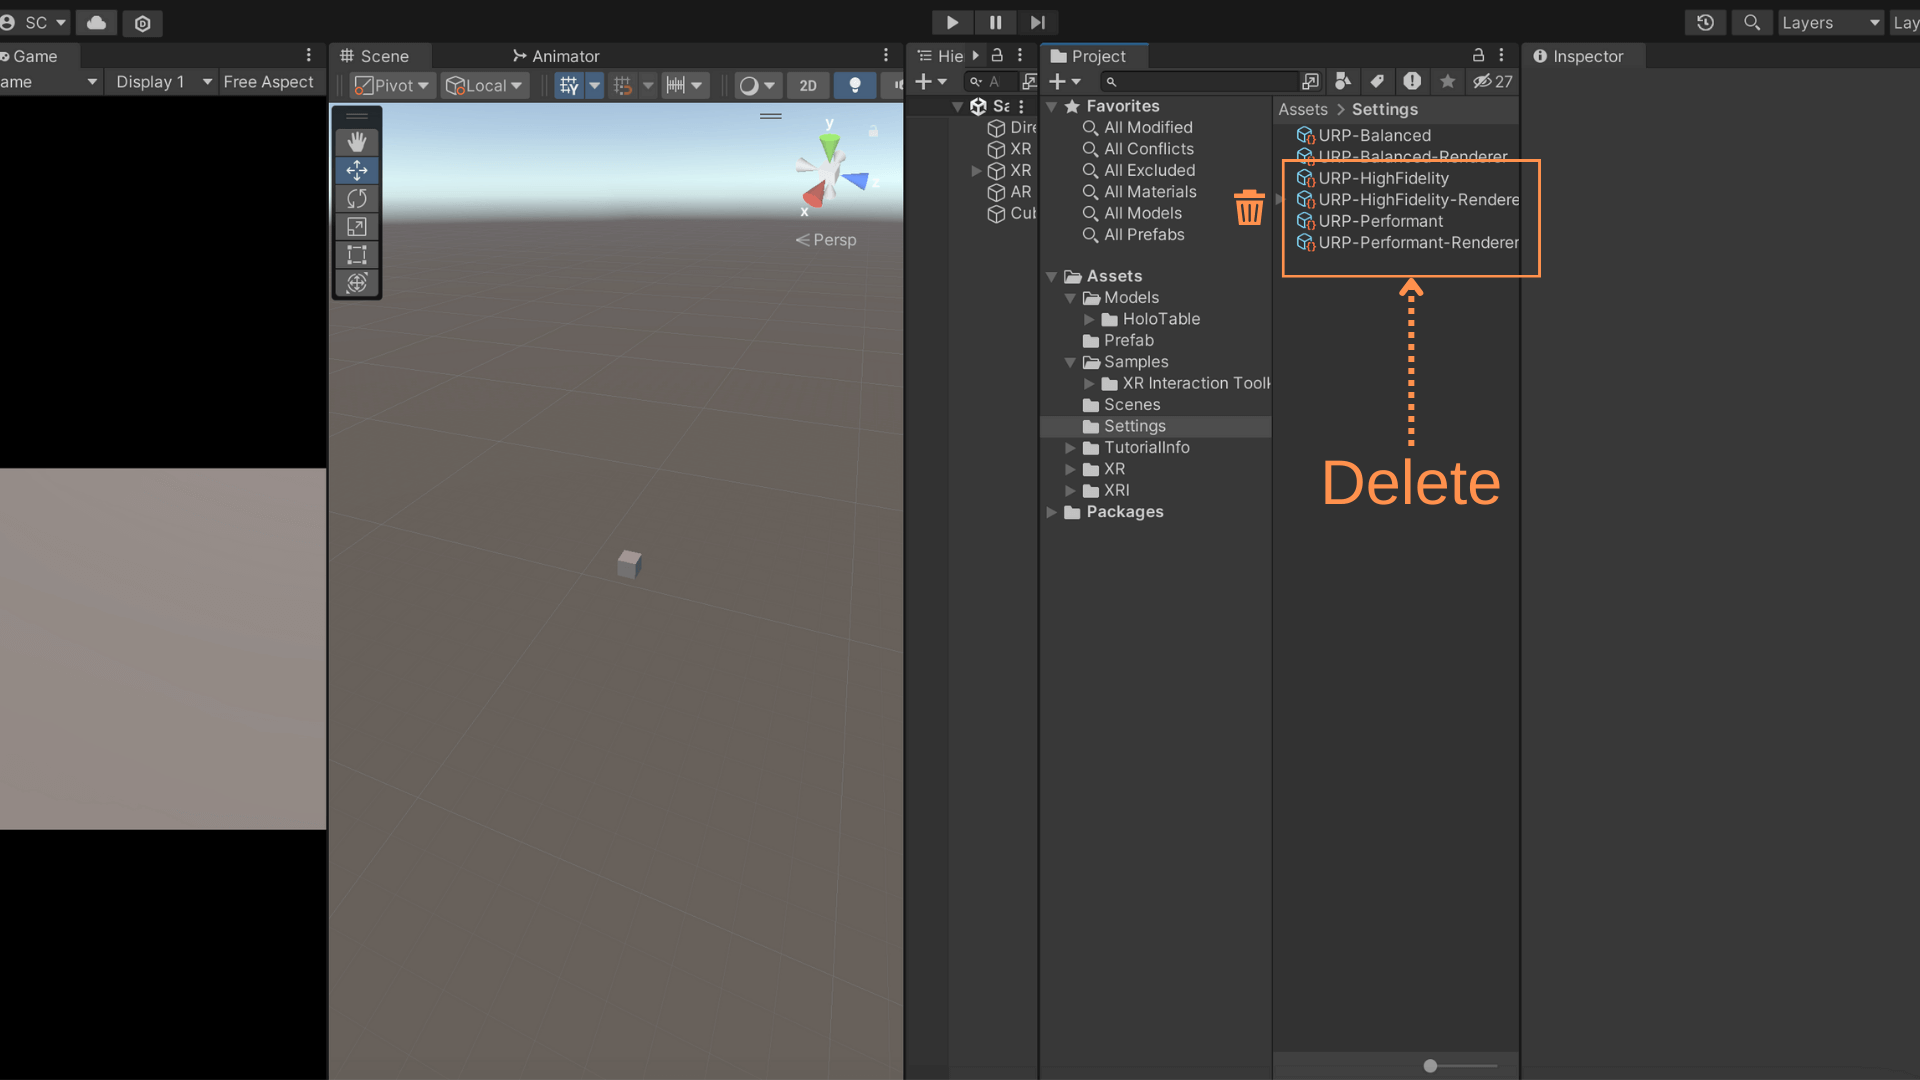
- Navigate to Assets > Settings and delete URP HighFidelity and URP Performant Render Pipeline settings.
- Select URP Balanced, then uncheck Terrain Holes and HDR checkboxes for improved performance.
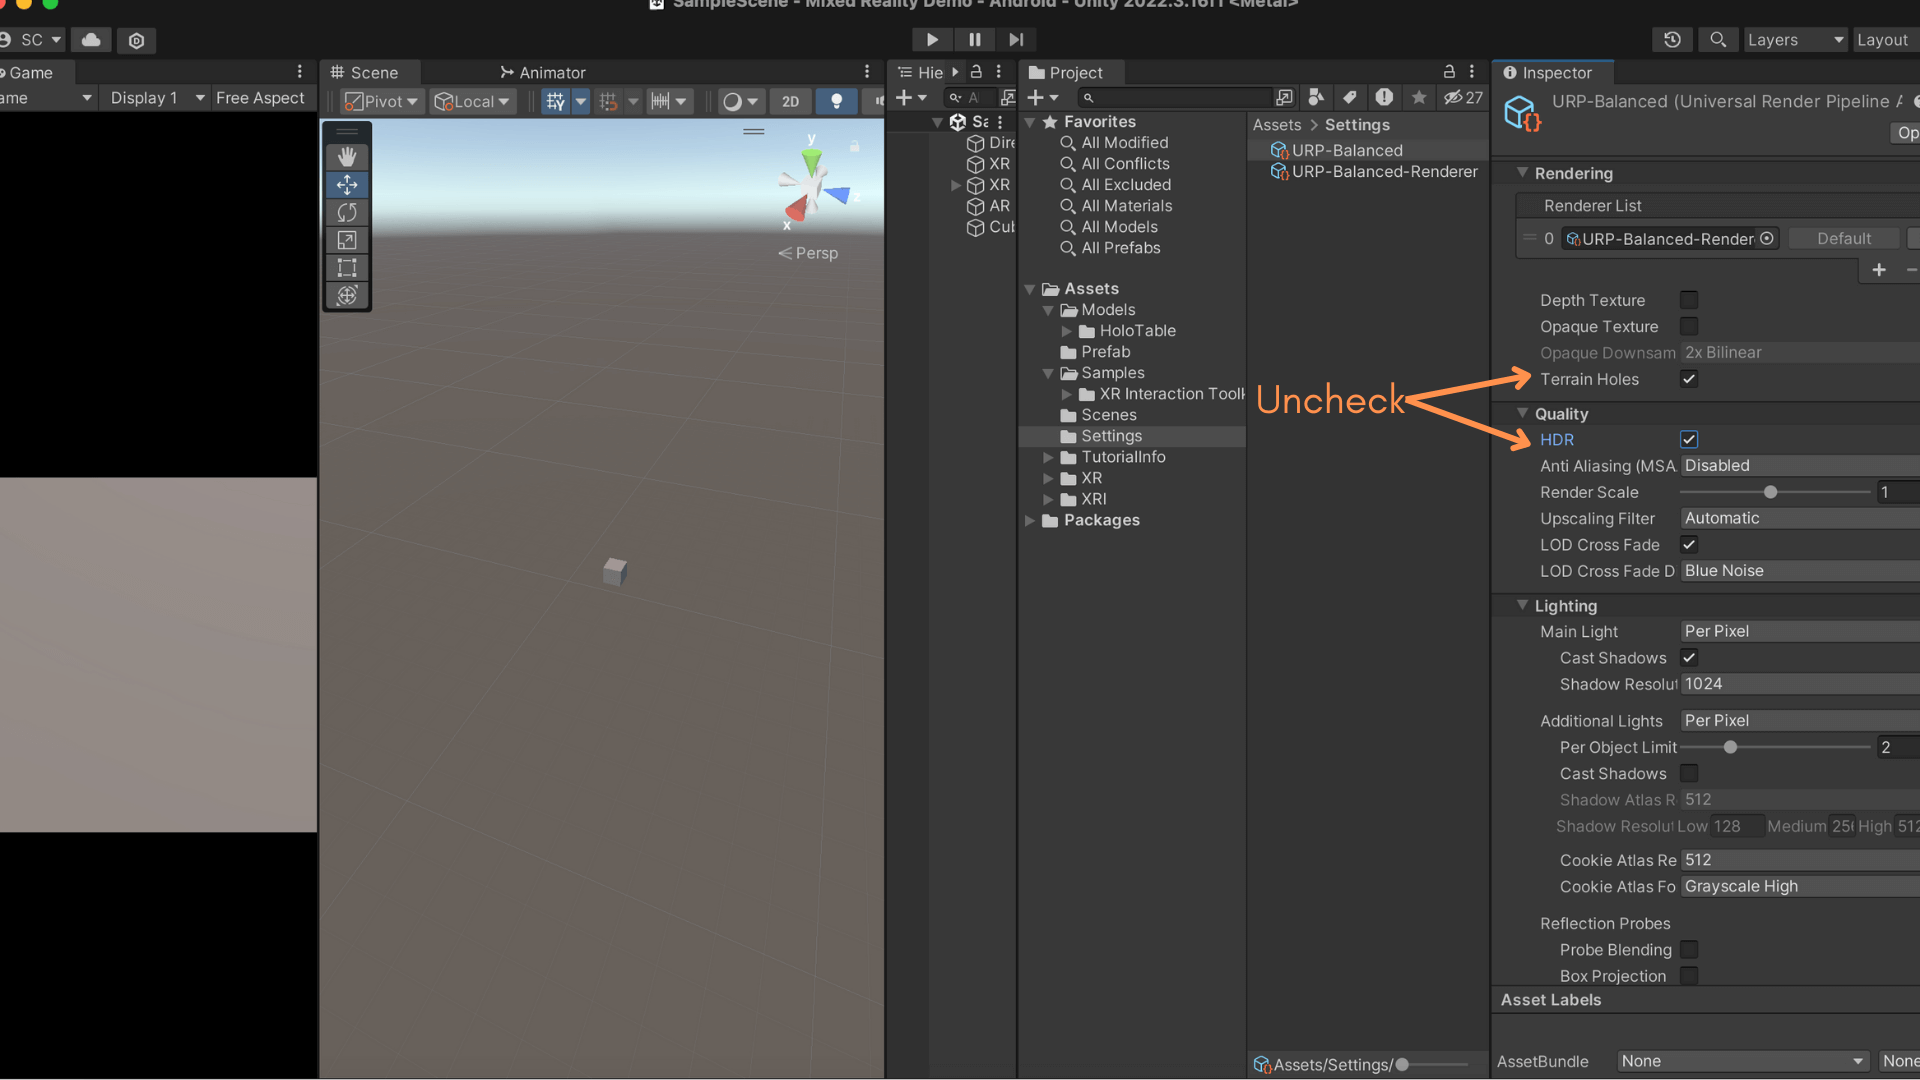
Disable HDR in URP Pipeline for Mixed Reality:
- Navigate to URP Pipeline settings.
- Under Quality, uncheck HDR to prevent a black background during Mixed Reality gameplay.
Conclusion :
By following these steps, developers can unlock the potential of immersive object placement, seamlessly blending the virtual and real worlds. Embrace the possibilities of Unity and Meta Quest 3, and embark on a journey to create captivating and interactive Mixed Reality experiences. Happy developing!